Veo 3 テクノロジーでアイデアをビデオに変える

まず、厳密な30秒のスクリプトを作成し、それをVeo 3の統合テキスト-to-ビデオエンジンに投入して、数分以内に最初のストーリーボードを生成します。これにより、アイデアを精密に動くシーンに変え、テキストからビジュアルとサウンドへの明確な道筋が見えます。
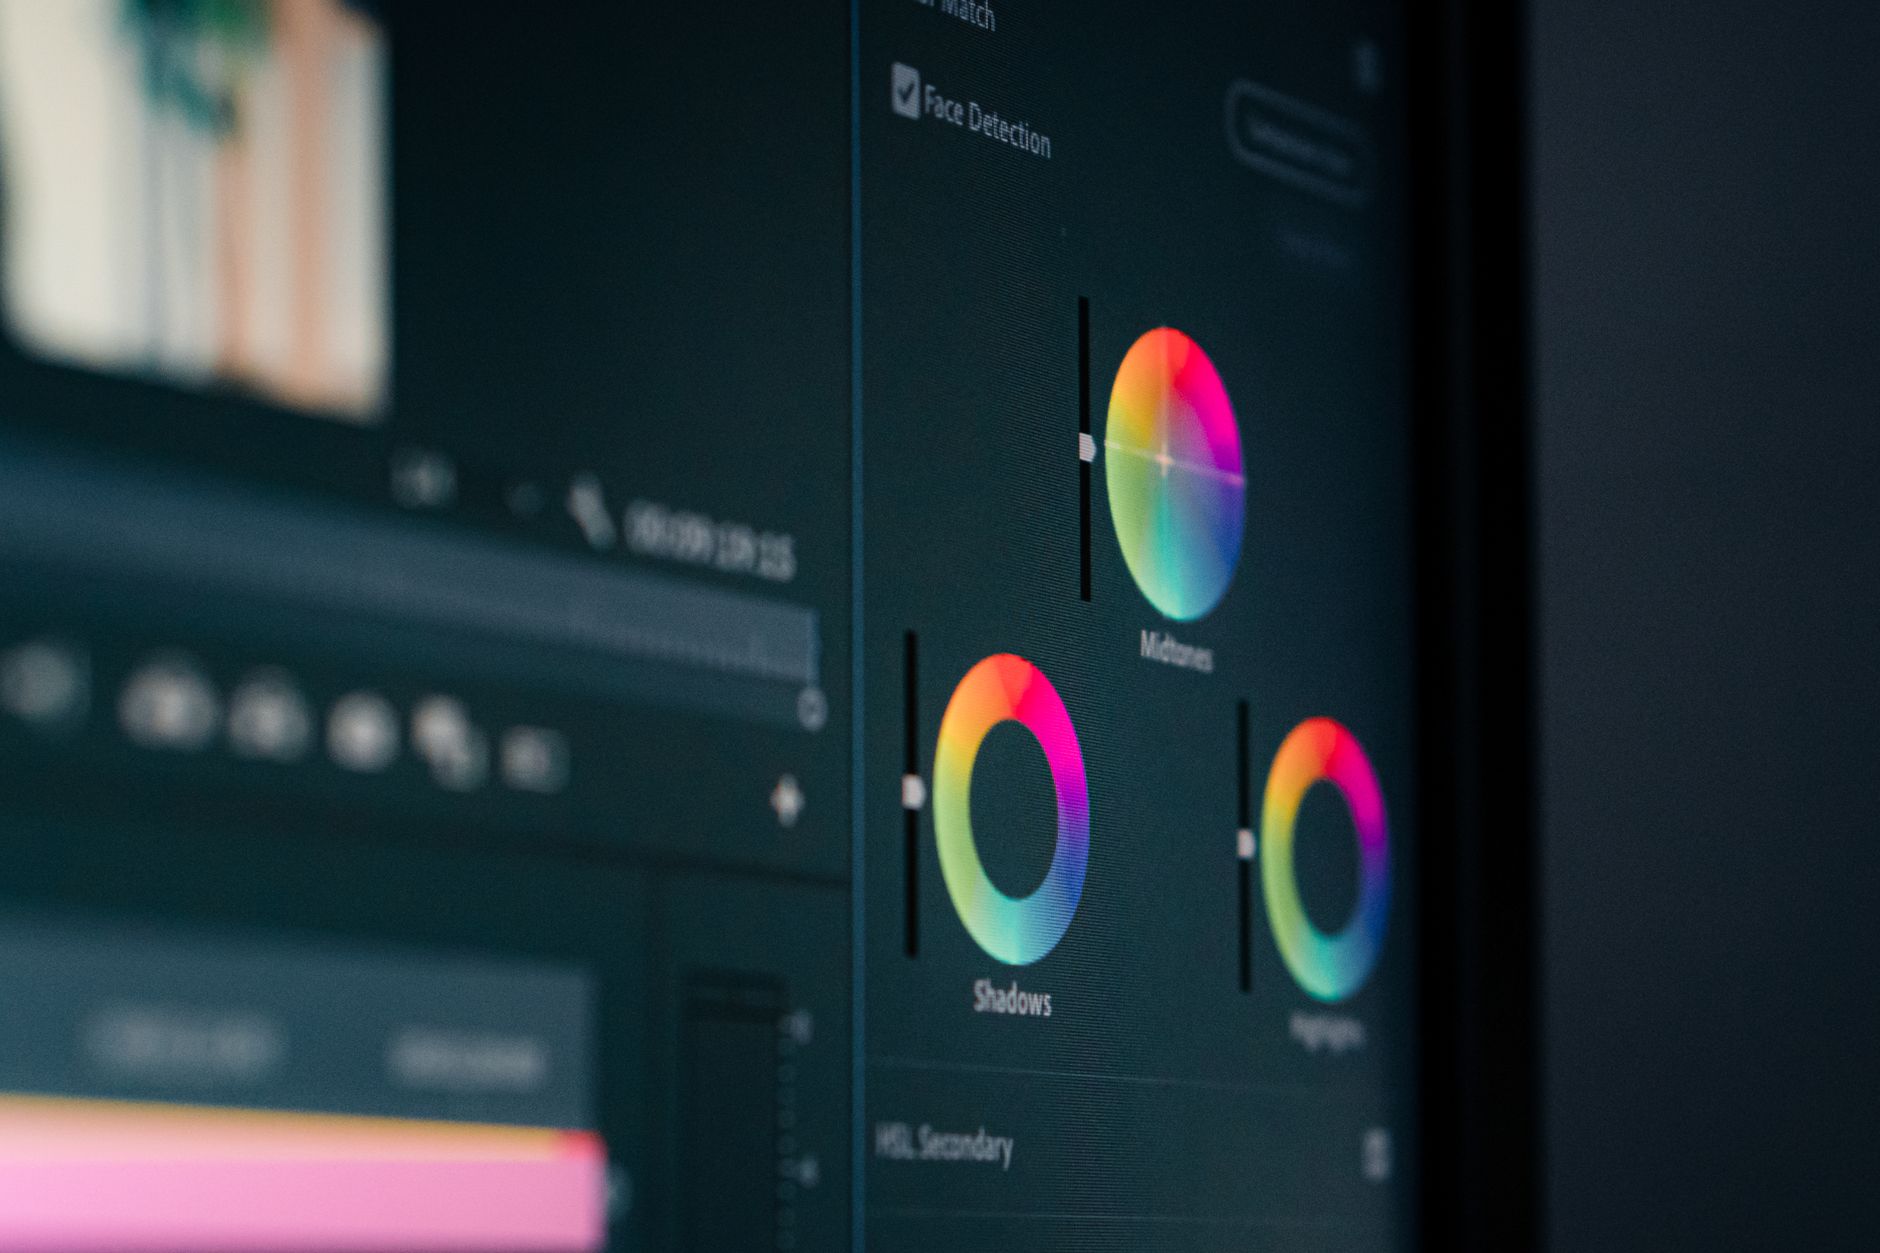
青のパレットを選択し、穏やかなペーシングを設定してカジュアルなトーンを維持しつつ、シーンのコンテキストに合ったオーディオとサウンドエフェクトを重ねます。周囲の音、例えば歩行や霧雨に注意を払ってリアリズムを追加します。
最初の通過で、Veo 3は歩行映像を測定されたトランジションでマッピングし、オーディオレイヤーをバランスさせ、シーン間のコンテキストを保持します。ビート間の微妙な静止を追加してムードを高め、テキスト-to-ビデオエンジンを使用して霧雨と雨の要素を背景に織り交ぜます。
統合コントロールを活用してプロフェッショナル品質の出力を形成:モーション、カラーグレーディング、オーディオ正規化を調整します。4K 60fpsでエクスポートするか、速い共有のために1080pを選択できます。トーンをカジュアルだが精密に保ち、ビジュアルがスクリプトの意図と青のトーンのムードに一致するようにします。
スリラーの雰囲気の為、テンポとカットポイントを数枚の決定的なフレームでマッピングし、Veo 3に視聴者を引きつけるトランジションを提案させ、ロボットのように感じさせないようにします。微妙なモーションを使って緊張を反映し、テキストの重要な行を中心にシーンをペース配分します。
プロジェクトを整理するために、シーン、テキストの行、サウンドと歩行ビートのキューをタグ付けします。このコンテキストで、クリーンなコンテキストを維持し、すべてのフレームがビジュアルだけでなくアイデアに奉仕するようにします。
アイデアからビデオへ:Veo 3でのサポート入力とストーリーボーディング

明確なコンセプトから始め、それをムードを捉えるイメージ-to-ビデオプロンプトを使用して5–7フレームのストーリーボードに翻訳します。朝のシーンでは、自然な朝の光、木々の風、背景の微妙なカラス鳴き声を記述;これらの詳細をプロンプトとして書き、シーケンスを通じてアイデアを可視化し、次のフレームを明確に設定します。これらのステップはアイデアからビデオへのスムーズな移行を確保します。
Veo 3はテキストプロンプト、イメージプロンプト、短い参照ビデオ、オーディオトラック、およびムードと環境ノートを含む追加入力をサポートします。ショット内の女性や歩行する被写体を添付し、プロンプトを行動にリンク;コンテキストノートを追加するとビジュアルとサウンドの整合が助けられます。これらの入力を使ってイメージ-to-ビデオ生成を導き、統一されたトーンを維持し、明確なプロンプトとコンテキストで最終出力を強化してより良い整合を実現します。
ストーリーボード戦略

各フレームにマイクロアクションを割り当て:女性の歩行、ハンドのクローズアップ、またはリバースアングルのリビール。プロンプトを意図に結びつける:ムード、照明、サウンド、モーション。プロンプトを使って構成とタイミングを固定;Veo 3がビジュアルをオーディオに整合させるために可視的なキューを指定します。リバースショットはコンテキストを提供し勢いを保ち、次のフレームはストーリーをスムーズに進展させて理解とエンゲージメントを構築します。
シンプルな歩行ショットから始め、風と背景のアンビエンスを重ねます。正確なプロンプトを使って色とテクスチャを形成し、自然に感じるトランジションを計画します。よく構造化されたシーケンスの力は、情報がフレームから次のフレームへ流れる方法にあり、シフトを示すキューを追加して生成をナラティブ目標に整合させます。フィードバックループを追加すると、結果を分析して次のイテレーションのプロンプトを洗練し、より良い生成の一貫性を達成できます。
自動編集ルール:Veo 3がシーケンス、トランジション、タイムラインを構築する方法
推奨:デフォルトでAuto-Editを有効にし、プロジェクトごとに設定を調整します。Veo 3は被写体、キャラクター、シルエット、および舞台裏の瞬間を読み取り、クリップをビートグリッドに配置して明確で変革されたフローを提供します。エンジンが重い作業を扱う間、コントロールを保つために迅速で具体的な調整を使用します。
コアシーケンシングルール
- コアブロックを定義:被写体、キャラクター、シルエットを特定し、それらの対話をビートにマッピングして各クリップが自然なアクションキューに座るようにします。これによりナラティブが理解しやすく、トランジションの準備が整います。
- ペーシングのバリエーションを推進:カット長を迅速に調整すると必要に応じてピンクの輝きムードを生み出せます;ショット間では、クリーンでスムーズなリンクを優先してジャークを感じさせません。
- 連続対話:対話行を密接に配置して勢いを保ち、Veo 3にリアクションショットを配置させて各発言の背後に理解が明確に座るようにします。
- 生成のためのタグ付け:アクション、対話、被写体でクリップをラベル付けして自動アセンブリが統一されたストーリーを形成するのを助けます。変革された結果を望む場合、これらのタグがエンジンを穏やかに導きます。
- 品質ガード:自動アセンブルされたシーケンスをゆっくりスキムしてぎこちないポーズをトリム;各要素がメイン被写体をサポートし注意を散漫にしないようにします。
タイムラインターニングとトランジション
- ビートアライメント:クリップをテンポマーカーに大まかにマッピングします。Veo 3はメインタイムライン上でカットを配置しトランジションの提案をし、すべてがジャリングするシフトなしで流れます。
- 深さとレイヤリング:裏レイヤーを使ってコンテキストを明らかにしつつシルエットと被写体を可視に保ちます;微妙なオーバーラップが散らかりなく洗練を追加できます。
- トランジション戦略:ムードシフトを示すためにピンクの輝きでタイトなクロスフェードを組み込みます;静かな瞬間では、アクションがフレーム間で柔らかく座るように穏やかなフェードを使用します。
- 読みやすさチェック:明確なメッセージングはクリーンなタイミングから生まれます;必要に応じて数フレーム戻して、ナレーションや対話を通じて被写体がフォーカスを保つようにします。
- エクスポートとバックアップ:Google Cloudプリセットが信頼できる保存を提供し、vlogや生成中心のコンテンツのシーケンスの迅速な再生成を可能にし、実験が過ぎた場合に元に戻せます。
コンテンツのブランディング:Veo 3でのテンプレート、ロゴ、カラー、タイポグラフィ
Veo 3で堅牢なブランドキットを開始:1つのフォーマットファミリーを固定し、プライマリーロゴを予約し、ショット全体に流れるカラーパレットを定義します。 これにより最初のフレームから明確なビジョンを設定し、ドローンスタイルの映画的なコンテキストで統一された作成をサポートします。
テンプレートが構造と速度をガイド:イントロ、タイトルカード、ローワーサード、エンドスクリーンのコアセットを構築;ロゴを同じコーナーに固定してドリフトを避けます;タイポグラフィとカラートークンを保持しつつ複数のバリエーションを提供します。テキストがすべての背景で明確に保たれ、清潔なエッジと一貫したマージンでレイアウトを呼吸させ、スムーズに保ちます–使い古されたルックを避けます。
カラーがアイデンティティを固定します。 プライマリ、セカンダリ、アクセントセットを定義し、背景とライトの下で明確なコントラストを確保します。涼しいシーンのために微妙なフロストオプションを許可し、感情的な瞬間のために暖かいバイブを使用します。キー要素を強調するために輝きを使い、目を圧倒しないようにします。自然シーケンスでは、ブランドパレット内で木々(деревьев)の映画的な処理に傾き、全体のトーンと衝突する石のテクスチャを避けます。
タイポグラフィが読みやすさを駆動: 本文コピーのためにクリーンなサンセリフを、ヘッドラインのために特徴的なディスプレイを、線高を一貫して選択します。スケール(1-3-5)を確立し、フォントファイル、サイズ、カラートークンをドキュメント化します。コントラスト比がデバイス間でアクセシビリティガイドラインをパスする静的チェックを追加し、容易にスペースとトラッキングをコントロールしてすべてのフォーマットでスムーズなフローを維持します。
複数のバリアントで実験と検証: テンプレートとカラーコンボのバリエーションを作成し、異なるスクリーンでテストするために複数のフォーマットでエクスポートします。視聴者応答を比較するためのコントロールバージョンを維持し、ロゴの画面滞在時間と各色のボールドさを調整します。Veo 3のドラッグアンドドロップを使ってビジョンを安定させ、ロゴからメッセージへ視聴者を導くシネマティック-ルックで映画的に保ちます。マークを表示するフレーム数を計画(сколько)し、キャンペーン全体で容易に再現できるルックを保ちます。
エクスポート、品質チェック、ライブプレビュー:アップロードのためのビデオの最終化
プロジェクトを一般プラットフォーム向けに1080p 30fpsのダウンロード準備完了MP4 (H.264) ファイルとしてエクスポート;高モーションのターゲットの場合4K 60fpsに切り替え;1080pで10–20 Mbps、4Kで35–60 Mbpsのビデオビットレートをターゲット;AACステレオを192–320 kbpsで使用し、プロフェッショナル品質のビジュアルを確保するためにカラースペースRec.709を保持します。より安定させるために、クイックシンセシスパスを適用してカラーグレーディングを締め、デバイス間でより一貫したフッテージをアップロード準備完了にします。
品質チェック:オーディオピークを検証してクリッピングを避け、-6 to -1 dBFSのラウドネスを目指し、タイトなリップシンクを確保し、フレームレートの一貫性を確認します。アーティファクト、バンディング、過剰圧縮をスキャン;小さいスクリーンでキャプションとテキスト読みやすさをテスト。圧縮レベルを調整可能、問題が見つかれば再エクスポートを。ローワーサードなどのオーバーレイを追加し読みやすさを確保。
Live Previewを使って複数のデバイスやシミュレートされた再生環境でビデオをレビューします。トリッキーな照明でピンクにドリフトする可能性のある自然なスキントーン、特にピンクのニュアンスを探し、目の詳細(глаз)がシャープに保たれることを検証します。画面上の人物とキャラクターの瞬間をチェックして表情が明確に読めるように;霧雨や朝のグレアが見られた場合、露出とシャドウを調整してルックをバランスよく感じさせる;ジュエリーの微妙な輝きハイライトが上品に見えるようにします。
すべてがチェックアウトしたら、設定を変更した場合に再エクスポートし、メタデータ付きのダウンロード準備パッケージをアセンブル:タイトル、説明、サムネイル。ファイルサイズをプラットフォーム要件に合わせ、短く正確なシノプシスを追加。アップロード準備完了、このアプローチで成功と信じられないほど洗練されたビジュアルを設定します。
よくある質問:Veo 3のトラブルシューティングTipsとベストプラクティス
クイックベースラインから開始:Veo 3ファームウェアを最新ビルドに更新、メモリーカードのスペースを空け、安定した照明下で60秒のテストクリップを実行します。これにより評価のための信頼できる時間枠が始まり、すべてのチェックの堅固な開始点を提供します。問題が続く場合、電源を検証し、使用中にデバイスが安全な動作温度内に保たれることを確認します。
照明とカラー:録画パラメータを安全なデフォルトに設定–1080p60で安定したビットレート–し、安定した光でホワイトバランスを固定します。朝や明るい屋外シーンでは、手動露出がグリッチを導入するシフトを防ぎます。ハイライトをコントロールしてカバレッジ(покрывает)が自然に保たれ、人工的な輝きを避けるためにスキントーンを正確に保ちます。
安定性とモーション:歩行ショットの場合、ジンバルを取り付けたりモノポッドを使ったりしてフレームを安定させ、ゼリーのようなモーションを防ぎます。安定化できない場合、高いフレームレートで撮影し、ポストでスローダウンして明瞭さを保ちます。このアプローチでビジョンをシャープに保ち、容易に視聴可能(easily)にします。
フレーミングとカバレッジ:キー被写体を目の高さ(глаз)に配置して自然なパースペクティブを。 здесь直線的なホライゾンを維持し、急なパン避け;シーンを呼吸させショットが示すものを披露するために長いテイクを使用します。ランドスケープの場合、歪みを最小限に抑えつつ深さを捉えるバリアント(вариант)を調整します。
ポストプロセッシングと共有:サポートされる場所でH.265を使用してターゲット解像度でエクスポートし、輝きを保護するために一貫したカラープロファイルを維持します。製品ナラティブに共鳴するコンテンツを作成:ウイルス化するクリエイティブクリップはしばしばタイトな編集、明確なフック、強いサムネイルに依存します。ランドスケープを簡潔なストーリーを語るキャンバスとして使い、視聴者に価値を提供(provide)し、時間(time)を節約し品質を保つ無料ワークフローで公開します。
FAQクイックスタート:基本から開始–電源チェック、メモリースピード検証、ファームウェアバージョンの確認。然后推奨パラメータでテスト:1080p60、固定ホワイトバランス、安定露出。何回の試行?一つのベースラインテストと一つの朝(утром)の安定した光下の撮影から始め、イテレートします。各ステップは調整するパラメータ(parameters)を明確に示し、結果をドキュメント化して将来の撮影をガイドし、ランドスケープや都市の歩行ルート(walking)のような新しいシーンをカバーする際に信頼できる結果を容易に再現できます。
📚 AI生成とプロンプトに関する詳細
Ready to leverage AI for your business?
Book a free strategy call — no strings attached.


