참조 이미지를 편집하여 비디오의 얼굴을 미화하는 방법 - 단계별 가이드

대상과 일치하는 표정과 조명을 가진 참조 이미지를 선택한 후, 모션 데이터와 가이드 마크를 사용하여 비디오 프레임을 프레임별로 정렬하세요. 이렇게 하면 피부 톤이 일관되게 유지되고 대상이 움직일 때 부드러운 전환이 보장됩니다.
눈꺼풀, 입, 턱선을 형성하기 위해 수동 조정을 적용하면서 텍스처를 유지하세요. 아티팩트 핫스팟의 경우, 떠다니는 그림자와 색상 변화를 제거하세요. 그들이 드리프트를 눈치채면, 영향을 받은 프레임에 정렬을 다시 실행하여 전체적인 모습을 일관되게 유지하세요.
다양한 움직임과 표정을 위해 여러 참조 이미지를 활용하고, 다양한 조명 조건에서 테스트하세요. 비파괴 편집을 지원하는 플랫폼에서 색상 매칭을 사용하세요. 공통 색상 프로필을 내보내고 다음 패스에서 재사용하세요. 수동 워크플로우는 작업하는 모든 편집 플랫폼에서 편집을 예측 가능하게 유지합니다. 도구의 설치가 최신인지 확인하고, 이 설정이 한 프로젝트에서 여러 클립을 관리하는 팀에 대해 확장 가능하게 청구된다는 점을 유의하세요.
실제로는 전문가들이 사용하는 간소화된 제품 워크플로우가 비파괴 편집, 명확한 버전 관리, 그리고 선택한 플러그인의 설치를 결합합니다. 클립이 타이트한 움직임을 특징으로 할 때, 작업을 여러 패스로 나누고 노이즈와 앨리어싱의 제거를 수행하세요. 이 접근 방식은 변경을 되돌릴 수 있게 유지하고 자연스러운 말투와 표정이 중요한 대화형 영상물에 적합합니다.
마무리로, 여러 장치와 플랫폼에서 결과를 검증하고, 컷 전반에 걸친 모션 일관성을 확인하며, 팀원들이 동일한 모습을 재현할 수 있도록 미래 편집을 위한 간단한 수동 가이드를 제공하세요. 원본 이미지, 참조 패스, 최종 블렌드 프레임을 포함한 참조 폴더를 저장하여 지속적인 작업을 단순화하세요.
Beautify Faces in Video by Editing a Reference Image – Step-by-Step Guide; - Pro
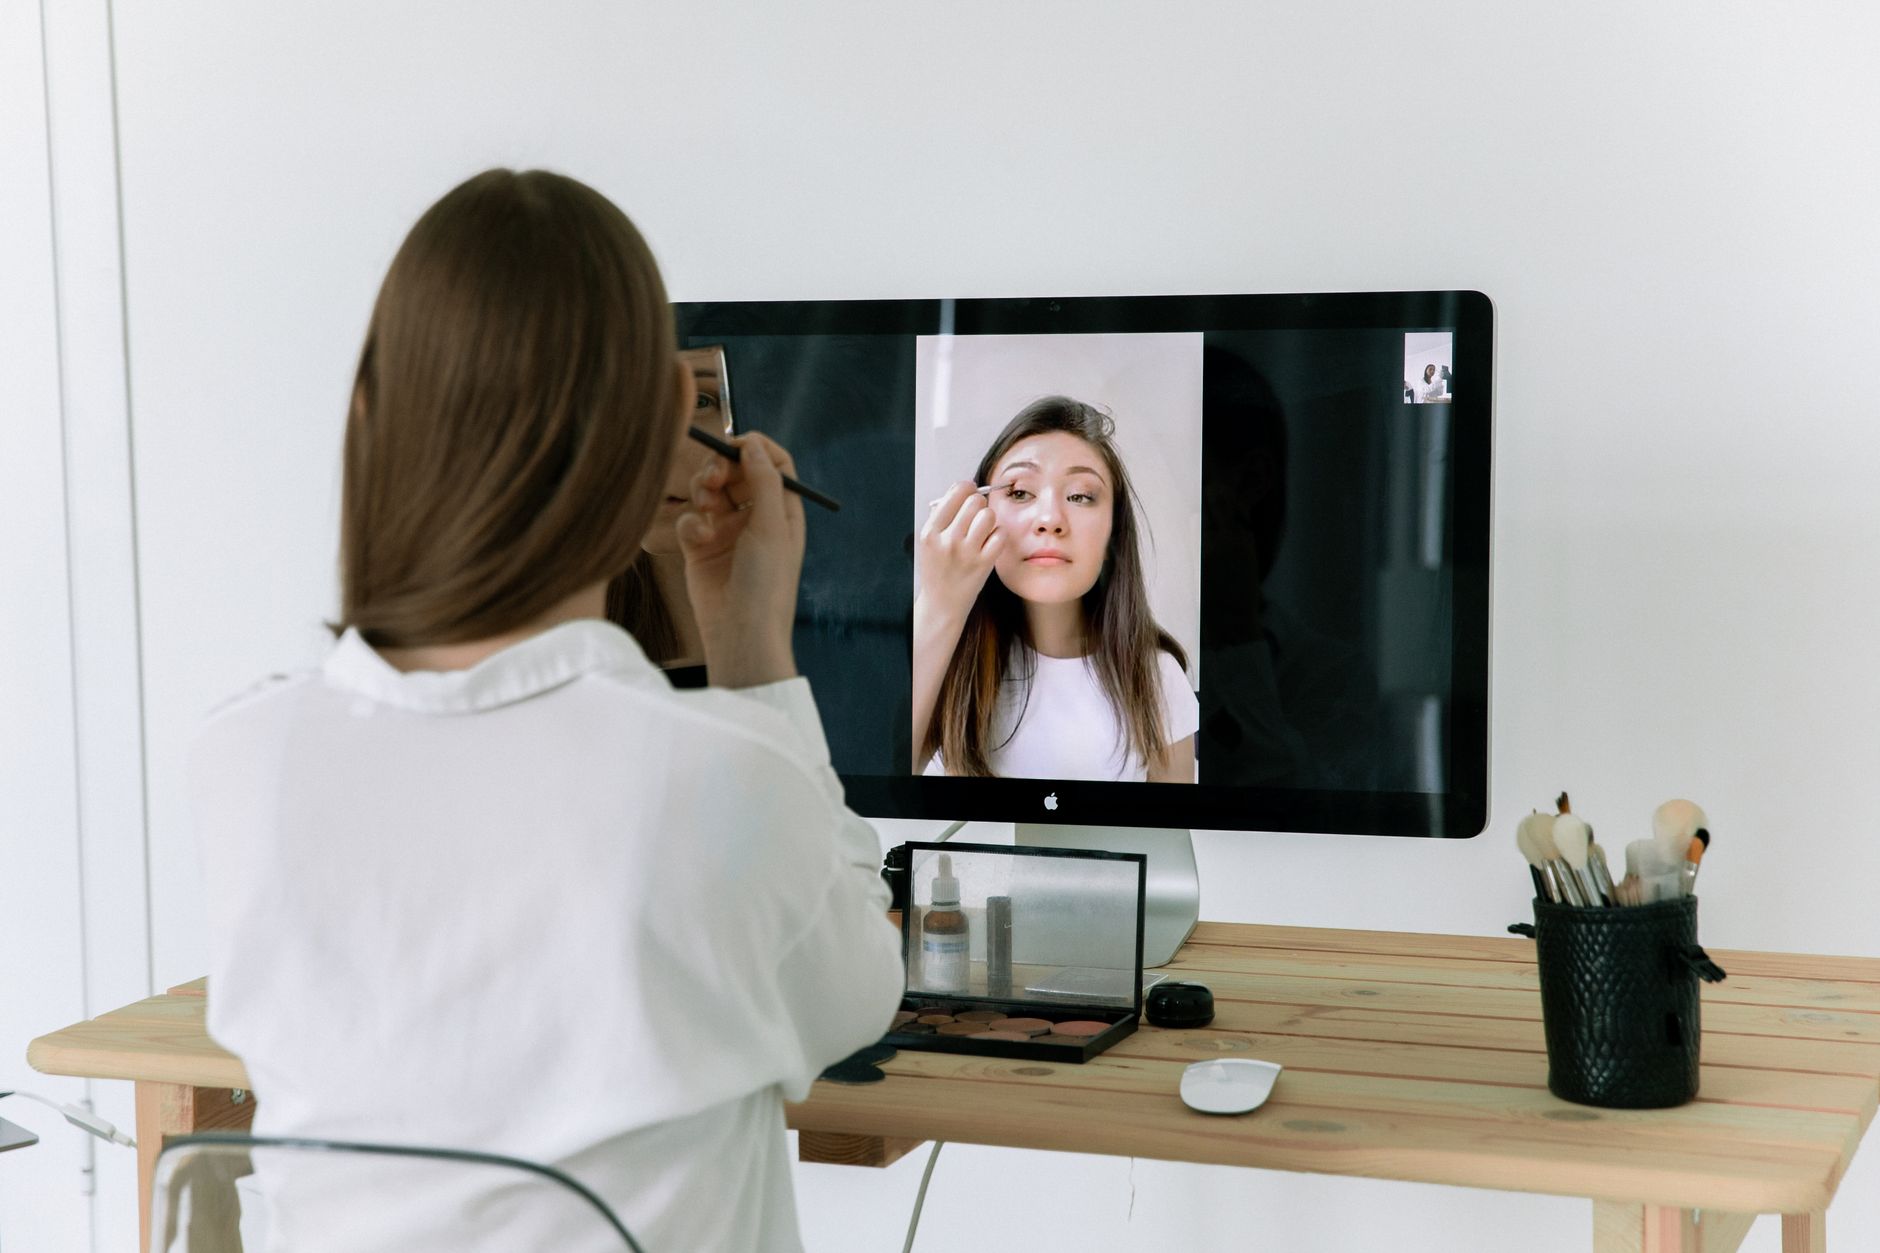
대상으로부터 명시적인 동의를 얻고 참조 이미지를 라이선스하세요. 외모 무결성을 보호하고 오인식을 피하기 위해 사용 조건을 설정하세요. 비디오 전반에 걸쳐 원활한 모습을 보장하기 위해 크기와 프레임이 일치하는 깨끗하고 잘 조명된 참조를 사용하세요.
- 목표와 프레임을 정의하세요: 목표 모습을 보여주는 참조를 선택하세요–명확한 피부 텍스처, 균형 잡힌 색상, 자연스러운 하이라이트. 프레임 경계를 기록하고 얼굴을 초점으로 유지하기 위해 편집을 계획하세요. 시청자를 산만하게 하는 복잡한 배경을 피하세요.
- 자산과 라이선스 준비: 참조에 대한 권리를 확인하세요 (유료 또는 무료)하고 고해상도 파일을 다운로드하세요. 프로젝트 옆에 저장하고 팔로워와의 기대를 설정하기 위해 교육 자료로 라벨링하세요.
- 비파괴 워크플로우 설정: 참조 기반 편집을 위한 별도의 레이어 또는 패스를 생성하세요. 원본 비디오를 그대로 유지하여 되돌릴 수 있게 하세요. 머리카락과 주변 프레임 세부 사항을 보존하면서 아티팩트 제거를 위해 얼굴을 마스크로 분리하세요.
- 색상과 조명 매칭: 참조와 비디오 간의 피부 톤, 밝기, 색상 범위를 비교하세요. 시각적 조화를 달성하기 위해 미묘한 색상 등급과 조명 조정을 적용하세요. 평균 조명에서 과포화되지 않는 자연스러운 모습을 목표로 하세요.
- 여러 패스에서 편집 적용: 구조적 세련화(눈 모양, 입 모서리)부터 시작한 후, 점진적인 단계에서 텍스처(여드름 제거, 모공)를 처리하세요. 가상 장면에서 플라스틱 같은 느낌을 피하기 위해 전체 얼굴 패스를 수행하여 모션 전반에 걸쳐 놀라운 결과를 유지하세요.
- 향상시키면서 진정성 보존: 주체의 외모를 정의하는 독특한 특성을 유지하기 위해 부드러운 스무딩과 절제된 조정을 사용하세요. 프레임 전반에 걸쳐 모습을 일관되게 유지하기 위해 포즈와 표정을 참조와 정렬하세요.
- 품질 확인 및 통합: 색상, 선명도, 프레임 정렬의 일관성을 보장하기 위해 여러 클립을 검토하세요. 시간적 깜빡임, 가장자리 아티팩트, 또는 색상 드리프트를 확인하세요. 최종 렌더 전에 문제를 수정하고 세련된 스타일을 위해 프레임 전환을 부드럽게 유지하세요.
- 윤리와 명확성으로 내보내기: 참조 기반 편집에 대한 간단한 공개와 함께 최종 비디오를 제공하세요. 청중을 대상으로 교육 콘텐츠를 소개할 때 접근 방식을 언급하여 산업 동료와의 투명성을 유지하고 시청자들이 결과를 신뢰할 수 있게 하세요.
Reference-Based Face Beautification for Videos
비디오의 조명, 포즈, 색상에 맞는 단일 참조 이미지를 시작으로, 얼굴 특징을 참조에 정렬하는 가이드 스무딩 패스를 적용하세요. 교육적 접근 방식은 타임라인을 건드리기 전에 참조에서 색상 균형을 검증하는 데 도움이 되어 샷 전반에 걸쳐 자연스러운 결과를 유지합니다.
에디터를 사용하여 각 사람의 얼굴 랜드마크를 감지하고 참조의 포즈 정규화 버전을 계산하세요. 움직임이 발생할 때 비율이 일관되게 유지되도록 프레임별로 얼굴 영역을 정렬하는 비파괴 워프를 적용하세요.
스무딩을 이익이 되는 영역으로 제한하고 눈, 입술, 눈썹과 같은 주요 특징을 보존하세요. 편집을 제한하고 피부 텍스처를 자연스럽게 유지하기 위해 마스크를 사용하세요. 프레임 전반에 걸쳐 플라스틱 같은 모습을 피하세요. 프레임에 조명 드리프트가 보이면 무거운 편집 대신 참조 매핑을 조정하고 가벼운 터치를 재적용하세요.
인플루언서 미학을 반영하면서 청중에게 눈에 띄지 않게 유지하는 두세 개의 프리셋을 생성하세요. 일관된 모습을 보장하기 위해 다양한 조명과 주체 톤에 대해 각 프리셋을 테스트하세요. 다른 장면의 분위기를 나타내기 위해 프리셋 이름을 변경하세요.
설치 및 에디터 워크플로우: 비디오 에디터에 플러그인 또는 스크립트를 설치한 후 프로젝트에 워크플로우를 통합하세요. 간단한 파이프라인을 설정하세요: 참조 준비, 랜드마크 정렬, 스무딩 패스, 최종 색상 확인. 미래 프로젝트를 가속화하기 위해 이러한 단계를 템플릿으로 저장하세요.
여러 사람을 처리하기 위해 클립 내 개인 간에 스케일을 일관되게 유지하면서 사람별 스무딩 대상을 계산하세요. 머리카락이나 배경에 적용되지 않고 얼굴 영역에만 편집이 적용되도록 마스크를 사용하세요. 시각적 산만함을 줄입니다. 이 접근 방식은 군중 샷이나 여러 참가자가 있는 장면 전반에 걸쳐 자연스러운 확장 가능한 결과를 탐색할 수 있게 합니다.
품질 확인: 짧은 미리보기 렌더링, 프레임 전반에 걸친 색상 균형 확인, 편집된 영역의 모션 안정성 확인. 최종 내보내기 전에 미리보기 기반으로 스무딩 강도와 랜드마크 허용 오차를 조정하세요.
참조 기반 미화로 절제되고 자연스러운 느낌으로 인정받는 일관된 교육 워크플로우를 제공할 수 있습니다. 에디터와 설치 워크플로우에서 방법을 탐색한 후 다른 사람들이 결과를 재현할 수 있도록 설정을 문서화하세요.
Choose a reference image with consistent lighting, frontal pose, and high resolution
균일하게 조명되고 정면으로 촬영되며 고해상도의 참조 이미지를 선택하세요. 최상의 결과를 위해 최소 2048x2048 px를 목표로 하며, 주체의 얼굴이 중앙에 위치하고 눈이 프레임 상단 1/3 근처 선에 있도록 하세요. 산만함을 피하기 위해 중립 배경이나 깨끗한 배경을 사용하고, 샷 전반에 조명을 일관되게 유지하기 위해 단일 세션에서 촬영하세요. 상업 e-커머스 자산을 준비 중이라면 이러한 표준이 비주얼 전반에 걸쳐 얼굴을 일관되게 유지하고 미화합니다. 편집을 시작하기 전에 이를 준비하고 필요 시 재처리할 수 있도록 원본을 건드리지 마세요.
조명과 색상: 최소 그림자가 있는 안정적인 광원과 5500K 정도의 중립 백밸런스를 사용하세요. 혼합 색온도와 색상 캐스트를 피하세요. 단일 조명 각도가 촬영 전반에 도움이 됩니다. 플라스틱 같은 모습 없이 스무딩을 허용하기 위해 노출이 피부 텍스처를 보존하도록 하세요. 동일한 조명과 설정을 사용하면 무료, 유료, 또는 월간 프로젝트의 클립 전반에 걸쳐 비주얼이 일관되게 유지되며 노이즈를 줄이고 처리를 가속화합니다. 조명을 장착할 수 없다면 주체를 확산된 일광이 있는 큰 창문 근처에 배치하고 부드러운 필로 보완하세요.
포즈와 배경: 머리 수준의 정면 포즈를 보장하고 턱이 바닥과 평행하며 기울임이 없도록 하세요. 배경을 최소화하거나 평범하게 유지하세요. 복잡한 배경은 산만함을 더하고 색상 인식을 변경할 수 있습니다. 얼굴 영역이 프레임의 40-60%를 차지하도록 하여 나중에 크롭할 여지를 주세요. 이 설정은 샷 전반에 걸쳐 얼굴을 선명하게 유지하고 정렬 드리프트를 피합니다.
해상도와 형식: 고해상도 참조 이미지를 시작하세요. 가능하다면 RAW로 촬영하거나 2048x2048 이상의 고품질 JPEG를 내보내세요. sRGB 색상 공간으로 저장하고 아티팩트 없이 스무딩을 지원하기 위해 세부 사항을 보존하세요. 더 큰 해상도는 비주얼 전반에 걸친 세련화에 더 많은 여지를 주고 워크플로우의 전체 속도를 돕습니다. 이미 참조 라이브러리가 있다면 월간 비디오 전반에 걸쳐 일관성을 위해 이 베이스라인을 재사용하세요. 이는 프로세스를 예측 가능하고 신뢰할 수 있게 유지합니다.
처리 팁: 과도한 편집을 피하세요. 필요한 곳에만 스무딩을 적용하고 자연스러운 피부 텍스처를 보존하기 위해 필터를 최소화하세요. 노이즈를 확인하고 나중에 무거운 수정 대신 적절한 노출로 소스에서 처리하세요. 이상적인 베이스라인과 정렬이 유지되는지 장면 전반에 걸쳐 참조를 모니터링하고 드리프트를 눈치채면 재촬영하세요. 견고한 참조로 시작하는 이러한 단계는 프로젝트 전반에 쇼케이스하는 얼굴에 충실한 집중된 비주얼을 제공할 수 있게 합니다.
| Criterion | What to check | Notes |
|---|---|---|
| Lighting | Even, neutral; consistent color temperature | Target ~5500K; avoid mixed temps |
| Frontal pose | Face straight on; eyes level; minimal tilt | Center face; avoid three-quarter angles |
| Background | Minimal or plain; free of clutter | Neutral backdrop improves reliability |
| Resolution | 2048x2048 px minimum; higher is better | Supports smoothing and edits |
| File format | High-quality JPEG or PNG; sRGB | RAW preferred if possible |
| Consistency | Same setup across shots | Ensures unified results throughout |
Set up a non-destructive workflow using masks, adjustment layers, and smart objects
비파괴 워크플로우를 사용하세요: 참조 프레임을 Smart Object로 변환하고 위에 조정 레이어를 배치하며 얼굴로 편집을 제한하기 위해 마스크를 적용하세요.
자연스러운 미소를 보호하기 위해 입술, 뺨, 턱선에 마스크를 적용한 후 배경에 별도의 마스크를 생성하여 주체를 선명하게 유지하면서 bgblur를 적용하세요. 부드러운 전환을 위해 2–6 px 페더를 사용하고 프레임 전반에 걸쳐 편집을 부드럽게 유지하여 녹화된 프로젝트 전반에 걸쳐 놀라운 결과를 보이게 하세요.
Smart Object에 클립된 Curves, Color Balance, Hue/Saturation과 같은 조정 레이어를 통해 톤과 색상을 적용하여 변경이 주체에만 영향을 미치도록 하세요. 이는 즉각적인 조정을 가능하게 하고 픽셀 데이터를 보존하며 미래 애플리케이션과 e-커머스 자산에서 일관된 모습을 지원합니다.
스무딩과 텍스처 작업을 위해 Smart Filters를 사용하고 Smart Objects 안에 편집을 수용하여 비파괴로 유지하세요. 다른 얼굴 스타일을 위해 마스크를 재구축하지 않고 링크된 Smart Object로 참조 이미지를 가져오고 교체하세요. 베이스 이미지를 변경하지 않고 별도의 레이어에서 facetune 스타일 세련화를 모방할 수도 있습니다.
연간 프로젝트를 위한 프리셋을 저장하고 애플리케이션 전반에 걸쳐 일관성을 보장하기 위해 벤치마크를 추적하세요. 여러 녹화 전반에 걸쳐 동일한 모습을 재현할 수 있도록 마스크 설정, 색상 커브, bgblur 조합을 템플릿으로 저장하여 워크플로우를 가속화하고 모두와 공유할 수 있는 신뢰할 수 있는 결과를 제공하세요.
클라이언트와 대화형 워크플로우를 유지하세요: 각 마스크와 조정 레이어가 무엇을 하는지 명확히 설명하고 피드백을 위한 빠른 연락 지점을 제공하며 변경을 문서화하세요. 이 접근 방식은 주체를 향상시키면서 미래 캠페인에 안정성과 다재다능성을 제공하는 세련되고 미래 준비된 결과를 산출합니다. 비파괴 편집에 의존하는 캠페인입니다.
Align the reference to video frames with facial landmarks and motion tracking
각 프레임에서 얼굴 랜드마크를 감지하여 시작하고 가장 안정적인 점(눈, 코, 입 모서리)을 사용하여 참조를 얼굴에 정렬하는 변환을 계산하세요. 이는 프레임이 얼굴 포즈와 정확히 정렬되도록 보장하여 드리프트 없이 정밀한 미화 편집을 가능하게 합니다. 머리가 기울어지거나 고개를 끄덕일 때도 모션 트래킹이 참조를 활성 프레임에 고정하고 시간 전반에 걸쳐 부드러운 전환을 지원합니다.
모션 트래킹과 랜드마크 기반 정렬을 사용하세요: 추적 유형 중 선택하세요–밀도 모션에 대한 광학 흐름, 강건한 키포인트에 대한 특징 기반, 또는 탄력성에 대한 하이브리드. 대부분의 클립에 대해 눈 모서리와 입 모서리를 사용한 6포인트 유사성 변환으로 시작하세요. 왜곡이 나타나면 어파인으로 업그레이드하세요. 이는 늘어나거나 벗어난 것이 아닌 자연스러운 모습을 산출합니다. 프레임 간 정렬이 예측 가능해져 편집에서 수동 조정을 줄입니다.
지터를 줄이기 위해 프레임 전반에 걸쳐 변환에 스무딩을 적용하세요: 알파 0.6–0.8의 지수 스무딩을 시도하거나 빠른 모션을 보존하면서 블러를 제거하는 가벼운 칼만 유사 필터를 사용하세요. 이는 참조의 무결성을 유지하면서 놀라운 시각적으로 부드러운 모습을 만듭니다. 변환 후 색상 데이터를 재샘플링하여 화이트닝과 색상 수정을 일관되게 유지하세요. 부드러운 평균 피부 톤을 유지하고 세부 사항을 블러하는 공격적인 샤프닝을 피하세요.
스튜디오와 프로젝트를 위한 워크플로우 팁: 대상 해상도에서 이미지와 비디오 프레임을 처리할 수 있는 도구를 선택하세요. 참조에서 각 프레임으로 데이터를 스트리밍하는 기능을 확인하세요. 좋은 도구는 직선 프로젝트를 위한 배치 처리를 지원하며 변환을 캐싱하고 장면 전반에 걸쳐 모션 데이터를 재사용하여 워크플로우를 간소화합니다. 정확한 정렬을 목표로 하면 몇 개의 키프레임뿐만 아니라 여러 프레임에서 검증하여 시퀀스 전반에 걸쳐 모습이 자연스럽게 유지되도록 하세요.
품질 제어를 위해 원본 얼굴에 대한 투영된 참조 오버레이를 비교하고 프레임당 평균 랜드마크 신뢰도와 같은 간단한 메트릭을 사용하며 필요에 따라 임계값을 조정하세요. 드리프트가 허용 오차를 초과하면 refit으로 트래킹을 다시 실행하거나 키 프레임에서 재초기화하세요. 이는 미묘한 표정 변화나 빠른 모션이 있는 다른 조명과 장면 전반에 걸쳐 시각적이고 일관된 모습을 유지하는 데 도움이 됩니다.
Match skin tones across scenes with color grading, LUTs, and selective corrections
깨끗한 프레임에서 단일 피부 톤 대상을 설정하고 베이스라인으로 고정하세요. 자연스럽게 읽히며 이미 따뜻하고 미묘한 세부 사항이 있으며 과포화가 없어야 합니다. 시각이 장면 전반에 걸쳐 일관되게 유지되도록 화이트, 노출, 그림자를 균형 있게 수동으로 조정하세요. 나머지 편집을 위한 벤치마크로 이 참조를 저장하여 가장 중요한 주체가 진행 전에 일치하도록 하세요.
기본 색상 등급과 전용 LUT를 적용하여 전역 균형을 설정하세요. 피부 톤 변화를 피하기 위해 LUT 조정을 미묘하게 유지한 후 각 주체의 피부 톤을 세밀하게 조정하기 위해 선택적 수정을 사용하세요. 얼굴을 분리하고 배경을 변경하지 않도록 마스크나 파워 윈도우를 사용하세요. 그림자나 하이라이트의 색상 캐스트를 수정하세요. 자연스러운 텍스처를 보존하여 매트한 피부 모습을 피하세요. 이는 세부 사항과 현실성을 그대로 유지합니다. 이 초점은 샷 간 드리프트를 제거하고 시각 패밀리를 일관되게 유지하는 데 도움이 됩니다.
스코프나 히스토그램으로 측정하는 도구를 사용하세요–시각 참조와 벤치마크를 사용하여 장면 전반에 걸친 평균 값과 색상 변화를 비교하세요. 의복이나 풍경에 영향을 미치지 않는 광범위한 변경을 피하고 피부 영역만 타겟으로 정밀 편집을 사용하세요. 편집할 때 피부 톤이 자연스럽게 보이고 최상의 균형을 달성하는 지점에서 멈추세요. 가짜 플라스틱 마무리를 피하고 과도하게 하지 않으면서 미화하세요.
다른 조명 조건 처리: 창문을 통한 일광, 실내 텅스텐, 혼합 조명. 각 시나리오에 별도의 LUT를 적용하지만 동일한 베이스라인을 유지한 후 선택적 수정으로 세밀하게 조정하세요. 인기 주체나 인플루언서의 경우 베이스 LUT를 재사용하고 세션 프리셋을 저장하여 일관된 모습을 유지하세요. 얼굴 톤을 왜곡하는 배경의 색상 스필을 제거하고 각 프레임에서 주체의 피부가 초점으로 유지되도록 하세요.
워크플로우 공유는 팀이 접근 방식을 확장할 수 있는 기술을 개발하는 데 도움이 됩니다. 명확한 단계, 몇 가지 핵심 기능, 조정할 위치에 대한 노트 세트로 구성된 간단한 수동을 사용하세요. 대부분의 에디터는 다양한 프로젝트 전반에 걸쳐 재사용할 수 있는 작은 LUT와 마스크 라이브러리를 유지함으로써 이익을 얻을 것입니다. 결과: 편집된 것처럼 보이지 않고 자연스럽고 미화된 피부 톤을 장면 전반에 걸쳐, 정확하고 믿을 수 있는.
Preserve natural expressions and textures by balancing smoothing with detail retention
프레임 수준에서 가벼운 스무딩 패스를 시작하고 텍스처 보존 마스크를 활성화하세요. 이는 미소 주변에서 특히 자연스러운 모습을 정의하는 마이크로 세부 사항을 지우지 않으면서 피부 톤을 부드럽게 유지합니다.
선택적 스무딩 적용: 눈, 입, 중앙 뺨 주변 영역을 보호하여 평평한 영역을 스무딩하면서 마이크로 텍스처를 보존하세요. 주체가 움직일 때 마스크를 추적하여 조명이나 배경이 변경될 때도 프레임 간 모습이 일관되게 유지되도록 하세요.
플라스틱 마무리를 피하기 위해 매트 조정을 사용하세요. 코와 광대뼈의 하이라이트를 유지하면서 모공과 미묘한 주근깨를 보존하세요. 텍스처를 평평하게 하지 않으면서 여드름을 청소하기 위해 remover와 erase 도구를 절제되게 사용하고, 프레임이 표정에 초점을 맞추도록 가장자리 보존을 선호하는 고급 소프트웨어 기능을 의존하세요. 블랭킷 블러보다.
균일한 워크플로우 유지: 다양한 배경 전반에 걸친 애플리케이션이 일관되게 유지되도록 월간 프리셋으로 스무딩과 세부 보존 설정을 저장하세요. e-커머스와 다른 애플리케이션에서 이 접근 방식은 자연스러운 모습을 희생하지 않으면서 전문적인 결과를 산출합니다. 필요 시 설치 단계로 플러그인을 재설치하고 편집이 프레임과 미소와 여전히 정렬되는지 확인하세요.
품질 제어: 움직이는 특징 주변의 아티팩트를 주시하면서 최적화된 프레임을 원본과 비교하세요. 입술이나 눈에 블러가 스며드는 것을 눈치채면 스무딩을 한 단계 줄이고 텍스처 보존을 재확인하세요. 사람이 진정성 있고 초점 맞춰지며 내보내기 준비된 상태로 보이도록 스무딩과 세부 간 균형을 유지하세요.
Ready to leverage AI for your business?
Book a free strategy call — no strings attached.


