Como Fazer um Vídeo para o YouTube - 7 Passos Essenciais - Tudo o Que Você Precisa Saber

Planeje bem: escreva um roteiro curto e um gancho claro em minutos, e mire em um comprimento de 5–8 minutos para um forte engajamento. Comece com uma ideia e um payoff direto para prender os espectadores desde os primeiros segundos.
Equipamentos importam: comece com um microfone embutido para provar viabilidade, depois atualize para um microfone USB externo para uma voz mais limpa. Se puder, adicione múltiplos microfones para capturar voz e som ambiente claramente. Essa configuração funciona bem para a maioria dos cômodos e orçamentos.
Defina um fundo limpo, como uma parede simples ou uma cena à beira de um rio para um visual natural e interessante. A iluminação deve ser uniforme: posicione uma luz principal a 45 graus e use um refletor oposto para suavizar sombras, para que seu rosto fique bem iluminado na câmera.
Grave em configurações prontas para o YouTube: 16:9, 1920x1080, 30 fps, MP4. Após filmar, edite para o ritmo: remova pausas longas, adicione extra B-roll para ilustrar pontos e use transições rápidas para manter o momentum. Você pode facilmente concluir o processo em um único dia.
Defina seu tipo de vídeo e alinhe-o com uma estratégia que se adapte ao seu público. Formatos especialmente envolventes misturam envolvente narrativa com passos práticos. Não há uma abordagem única que sirva para todos, escolha múltiplos tópicos que se encaixem no seu nicho e rotacione-os para manter fresco.
Publique em um cronograma confiável: mire em um ritmo semanal e acompanhe minutos assistidos, taxa de cliques e comentários. Use os dados para ajustar seu próximo vídeo você mesmo e continue melhorando o momentum do canal.
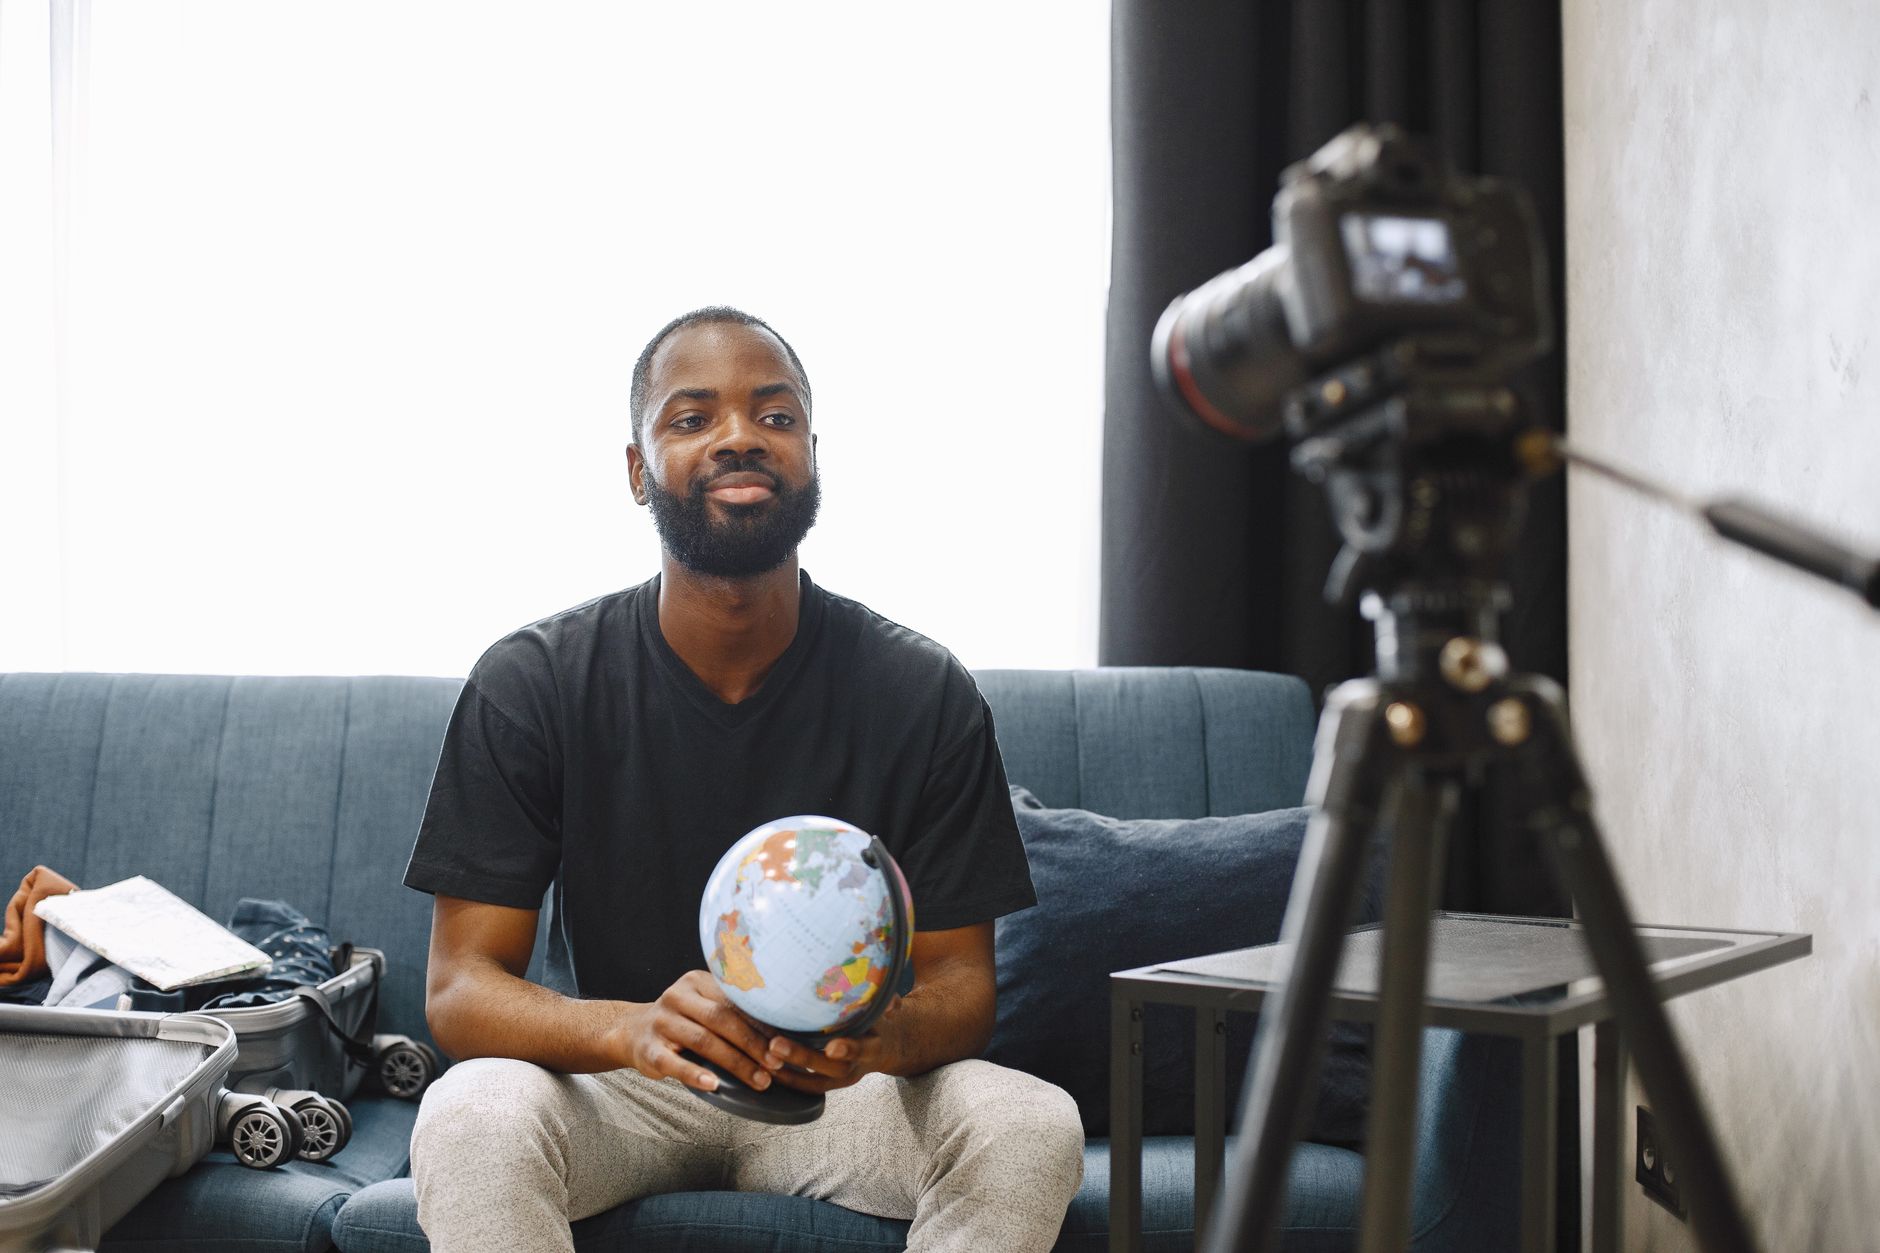
Passo 4: Prepare-se para Gravar e Prepare Seu Fundo
Configure seu fundo, fontes de iluminação e estabilização antes de pressionar o botão e começar a filmagem.
Escolha um fundo que combine com seu tom e mantenha distrações ao mínimo. Uma cor sólida ou textura sutil cria uma tela limpa para sua mensagem.
Posicione a iluminação para criar profundidade: coloque duas fontes a 45 graus, mais uma luz de fundo para separá-lo do fundo. Mire em um visual suave e uniforme que suporte seu estilo e mantenha a cor consistente. Marque o chão com fita e posicione o sujeito nessa linha para manter a distância previsível.
Estabilização importa: monte a câmera em um tripé resistente ou gimbal para tomadas em movimento. Se faltar espaço, ative a estabilização de software no seu software e teste imediatamente.
Defina um buffer de cinco pés entre câmera e sujeito, e mantenha uma distância similar atrás de você para reduzir reflexos. Enquadre por tipo de tomada (close-up, médio, amplo) e considere como o fundo suporta sua opinião sobre o tópico.
Mantenha cabos e adereços organizados; uma superfície arrumada acelera a filmagem e ajuda na consistência. Para profundidade, adicione uma pequena planta ou objeto que transmita o contexto do seu projeto, sem sobrecarregar o quadro.
Teste uma série rápida de tomadas: cinco curtas capturas em ângulos diferentes, depois escolha a melhor. Se quiser um visual de alta qualidade, considere atualizar a câmera ou monitor, e encontre software e acessórios compatíveis para agilizar o fluxo de trabalho.
Antes de gravar, salve um preset para exposição, balanço de branco e correção de cor; isso atua como referência entre as tomadas e mantém um tom consistente para o projeto.
Escolha um fundo limpo e sem distrações
Use uma parede simples ou fundo seamless em tom neutro para maximizar a clareza. Uma superfície cinza claro, bege ou azul pálido minimiza reflexos e mantém o foco em você durante os primeiros segundos da sua introdução.
Mantenha superfícies ao seu redor desobstruídas; remova criados-mudos, monitores ou itens decorativos que chamem atenção. Deixe bastante espaço vazio ao redor do seu torso para que seu rosto permaneça o ponto focal e sua voz soe natural durante a introdução. Evite descrições longas na tela; o fundo deve apoiar sua mensagem.
Se não puder pintar uma parede ou pendurar papel seamless, configure um fundo de tecido sem rugas e esticado. Use grampos ou fita para mantê-lo esticado e posicione-o a pelo menos 1,5 metro atrás de você para evitar sombras no fundo, o que ajuda a diferença entre primeiro plano e fundo a permanecer limpa enquanto você mantém a atenção do público.
Iluminação importa: use duas fontes difusas a 45 graus, mirando cerca de 1000 lux no seu rosto, e mantenha o equilíbrio de cor em cerca de 5600K. Para filmagens noturnas, suplemente com lâmpadas balanceadas para luz do dia para evitar tons de pele amarelados. Com iluminação clara, sua linguagem flui mais naturalmente e sua mensagem de marketing permanece consistente entre sessões de upload.
Teste e compare: grave um quadro de 3–5 segundos e revise capturas de tela para confirmar a diferença em clareza. Se o fundo parecer agitado, remova-o e tente uma superfície mais plana. Quando você fizer upload, pequenas inconsistências se tornam óbvias, então faça uma verificação rápida e ajuste antes de publicar.
Mantenha o fundo simples e amigável; um público engajado fica com você por mais tempo quando o fundo apoia a mensagem em vez de competir com ela. Use um programa estável para manter a consistência de cor desde o primeiro tiro até o corte final, garantindo que sua introdução pareça coesa para uploads ao longo do ano, e você está construindo uma presença clara e envolvente que ressoa com seu público.
Otimize a iluminação: posicione luz principal, luz de preenchimento e luz de fundo
Posicione a luz principal em um ângulo de 45 graus para o seu rosto, ligeiramente acima do nível dos olhos, e cerca de 1,5 m de distância, usando um difusor para manter tons de pele naturais. Pense em três pontos de luz: principal, preenchimento, fundo.
Coloque uma luz de preenchimento no lado oposto com intensidade menor – aproximadamente 30–50% do poder da principal – para suavizar sombras enquanto preserva textura. Se faltar uma segunda luz, rebata luz de uma parede branca ou use um refletor e feche as cortinas para controlar a luz solar. Lembre-se de que o equilíbrio cria profundidade em vez de planura.
Direcione uma luz de fundo para o fundo para separá-lo do fundo. Defina-a baixa (cerca de 10–20% da principal) e mire em uma lavagem uniforme; um suporte dedicado pequeno a mantém estável. Essa separação adiciona profundidade real à imagem final e impede que o fundo roube atenção.
Combine temperaturas de cor com o cômodo: luz do dia em torno de 5200–5600K para a principal, com um preenchimento mais quente (3200–4200K) se necessário. Faça o balanço de branco da câmera para a mistura escolhida, e evite grandes diferenças de temperatura que compliquem a correção de cor no Premiere ou Camtasia. Esses passos gerais funcionam em quase qualquer cômodo e melhoram muito a consistência.
Aqui estão várias verificações rápidas que você pode fazer durante a configuração: teste reflexos nos olhos, verifique tons de pele em um quadro de referência e garanta que o fundo permaneça uniformemente iluminado. Esses passos se aplicam à maioria das configurações e mantêm seu curso no caminho certo.
Iluminação de terceiros pode complementar seu equipamento, mas mantenha a configuração limpa. Você não precisa de milhares de dólares em equipamentos. Seja atento ao copyright ao usar templates ou presets de terceiros. Isso começou com uma única luz principal e escala bem para dicas de especialistas e é fácil de recriar em um curso ou em casa. Inscreva-se no canal para mais dicas e lembre-se de testar a configuração em condições reais de filmagem aqui.
Defina o enquadramento da câmera: altura, distância e regra dos terços
Defina a câmera no nível dos olhos para manter o olhar do público e conectar-se facilmente com os espectadores.
Posicione os olhos na linha horizontal superior da grade, usando as linhas restantes para posicionar ombros e torso para que o sujeito fique em um terço vertical ao longo da imagem, o que mantém a atenção focada no quadro inteiro.
Distância importa: comece com uma cabeça falante a 0,9–1,2 m, uma tomada de torso a 1,2–1,8 m e uma quadro completo a 2,0–3,0 m. Mantenha espaço acima da cabeça de cerca de 2–5 cm para evitar aglomeração na borda superior. Essa abordagem funciona em fluxos de streaming e compartilhamento, e se alinha com especificações comuns usadas por criadores em busca de configuração confiável.
Mantenha a câmera estável com um tripé ou pegada firme para prevenir uma epidemia de filmagens tremidas; a estabilidade torna a imagem profissional e reduz a fadiga do espectador em milhares de quadros.
Na prática, mil decisões minúsculas moldam a composição final: alinhe características principais com as linhas, respeite a regra dos terços e ajuste o espaço no quadro ao longo da filmagem. Quando você verificar as especificações da sua câmera e lente, teste uma única tomada para verificar o resultado antes de voltar para gravar.
| Tipo de tomada | Altura da câmera | Distância do sujeito | Notas de enquadramento |
|---|---|---|---|
| Cabeça falante (cabeça e ombros) | Nível dos olhos | 0.9–1.2 m | Olhos no terço superior; espaço acima da cabeça ~2–3 cm; use linhas |
| Tomada média (torso) | Nível dos olhos | 1.2–1.8 m | Torso visível; mãos permitidas; espaço para gestos |
| Tomada ampla (corpo inteiro) | Baixa para nível dos olhos dependendo da altura | 2.0–3.0 m | Fundo conta a história; mantenha linhas alinhadas |
Quando você transmitir ou compartilhar, planeje em torno de requisitos de dados: 8.000–12.000 kbps de vídeo para 1080p30 e 128–256 kbps de áudio são alvos típicos; essa especificação importante ajuda a manter a qualidade da imagem em mobile e desktop. Mantenha uma configuração elétrica estável, afaste cabos de caminhos de luz e câmera, e cuide da iluminação para que a imagem permaneça clara em todos os dispositivos.
Aqui está uma lista de verificação rápida para ter em mente: alinhe os olhos no terço superior, posicione o sujeito ao longo das linhas, mantenha estável e teste a distância antes de voltar para gravar. Se você pesquisar por dicas, descobrirá que uma abordagem simples de enquadramento se mantém em milhares de vídeos de entretenimento.
Garanta áudio claro: posicionamento do microfone e tratamento do cômodo
Posicione o microfone a 6–8 polegadas (15–20 cm) da sua boca e incline-o 30–45 graus fora do eixo, com um filtro pop a 2–3 polegadas na frente para domar plosivas enquanto preserva o tom natural. Prepare-se configurando o microfone em um suporte estável e conectando uma interface simples para monitorar em tempo real.
Escolha um tipo de microfone adequado ao seu espaço: um cardioide dinâmico lida melhor com reflexos do cômodo; um condensador adiciona detalhes, mas precisa de controle mais apertado de reflexos. Se o seu cômodo for pequeno, mantenha o microfone mais próximo para limitar o som do cômodo; com tratamento adequado, você pode recuar para capturar mais ar enquanto permanece claro.
Estude seu cômodo e identifique pontos de reflexão primários entre as paredes ao redor da sua mesa. Marque esses pontos e instale absorvedores ali; use painéis de 2–4 polegadas, mais um tapete ou cortina pesada para amortecer o rebound. Adicione armadilhas de graves nos cantos para controlar o grave que pode embaçar a fala. Se puder, posicione uma superfície reflexiva atrás do microfone em um ângulo que minimize o rebound direto; isso ajuda a controlar o som geral e facilita manter um tom consistente.
Configure um sistema simples para monitoramento: microfone → interface de áudio → computador; mantenha o phantom power desligado para microfones dinâmicos e ligado para condensadores; grave em 44.1 ou 48 kHz, 24-bit; ative um filtro passa-alta em torno de 80 Hz para reduzir ronco; garanta que o piso de ruído fique abaixo de -60 dBFS e picos fiquem abaixo de -6 dBFS.
Aplique compressão para nivelar: razão 2:1, limiar em torno de -20 dB, joelho suave, ataque cerca de 10 ms, liberação cerca de 60 ms; ajuste para que a fala caia na mesma faixa entre frases e segmentos de timelapse. Isso mantém o tom estável entre as tomadas.
Prepare seu fluxo de trabalho incorporando feedback de filmagens anteriores; estude tendências em configurações de áudio de criadores; além disso, use um chamado à ação para convidar espectadores a compartilharem suas dicas sobre o que funcionou para eles. Se você postar no Facebook, mencione a configuração de áudio na legenda para ajudar outros a aprenderem. Provavelmente, essa abordagem atrai mais pessoas e aumenta a retenção.
Mantenha toques de polimento ao longo do projeto: o mesmo nível de clareza entre cenas ajuda o público a se conectar com você, e áudio forte complementa suas miniaturas e ritmo. Aprendendo de cada sessão, convide input de espectadores e prepare filmagens futuras com o tratamento de cômodo necessário em mente para continuar atraindo mais pessoas.
Planeje figurino e adereços para evitar choques de cor e reflexos
Comece com uma paleta de cores matte única para figurino e adereços para manter choques de cor e reflexos longe da lente, e teste colocando itens na área frontal do set para revisar como eles aparecem no filme real.
Uma coisa a mais: mantenha uma peça de roupa sobressalente ou acessório pronto para trocar durante a filmagem se algo aparecer mal na câmera.
- Plano mestre: crie uma lista mestre de figurino com 2-3 backups por pessoa, marque roupas prontas e remova qualquer coisa com acabamentos brilhantes ou logos grandes. Inclua uma opção menor e mais simples para uma troca mais rápida se necessário; isso ajuda seu performer a atuar com confiança.
- Cor e composição: escolha 3-4 tons que contrastem com sua área, mas fiquem coesos com o set; mantenha cores legíveis na câmera e use uma ferramenta de verificação de cor integrada ou um dropdown de amostras para comparar opções. Garanta alinhamento bonito com a composição geral e selecione apenas itens que contribuam para a tomada em vez de distrair.
- Adereços e primeiro plano: escolha adereços pequenos e não brilhantes que suportem o sujeito e evitem brilho. Itens frontais devem aprimorar o quadro, não dominá-lo; descarte espelhos ou superfícies reflexivas da área de tomada.
- Tecido e acessórios: prefira algodão, linho ou misturas matte; evite cetim, couro patente ou plásticos brilhantes. Remova joias ou acentos metálicos que captem luz; teste como tecidos respondem à sua iluminação para evitar desbotamento ou mudanças de cor na lente.
- Logística e teste: agende uma corrida de teste rápida e mantenha alternativas prontas para um turnaround mais curto. Dica pro: mantenha um dropdown de looks de backup e adicionais na área de figurino para acelerar decisões. Um mini-teste grátis antes de filmar mostra onde mudanças são necessárias.
- Alinhamento de marca e tópicos: garanta que o figurino suporte seus visuais de marketing. Além disso, planeje como as roupas contribuem para os tópicos planejados e mostrem consistência entre episódios. Roupas ideais permanecem simples e coesas, para que a atenção do espectador fique na mensagem em vez da roupa.
- Lista de verificação rápida para a filmagem real: passe por uma verificação da frente para trás para confirmar que nenhum choque de cor aparece na câmera; verifique que não há reflexos de adereços ou joias; confirme que o set aparece como pretendido e que o plano mestre rende a composição desejada.
📚 Mais sobre Marketing em Mídias Sociais
- Como Filmar um Vídeo para o YouTube em Qualidade Profissional - 7 Passos
- Como Criar uma Marca d'Água para Vídeo do YouTube em 2026 - Um Guia Passo a Passo
- Como Crescer Seu Canal do YouTube - 9 Dicas e Truques Essenciais
- Como Impulsionar a Retenção do Seu YouTube com o Roteiro de Vídeo Certo - Um Guia Passo a Passo Comprovado
- Marketing no YouTube 2026 - Estratégias Essenciais para Crescer Seu Canal
Ready to leverage AI for your business?
Book a free strategy call — no strings attached.