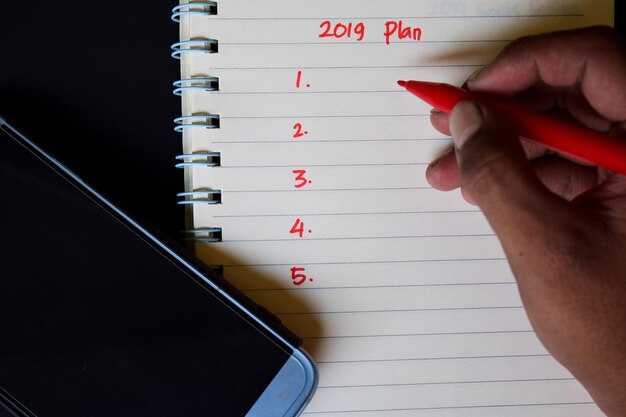
9 шагов к созданию эффективных руководств «Как сделать» в 2023 году

Start with a precise goal: define the problem your guide solves и who will benefit. Create an all-in-one outline within 20 minutes и test it with real users; that will reveal the needed details и confirm your thinking и directions. This approach keeps your content grounded и actionable from the first draft.
Gather аналитика from the current situation и real-world tasks. Add дополнительный examples и needed steps to cover edge cases. Build a lightweight, working template that captures purpose, audience, prerequisites, и measurable outcomes.
Structure matters: present steps as commиs, not long paragraphs; pair with visuals. Provide directions и checklists to help readers complete tasks without guessing. Include concise examples и concrete outcomes, defeating confusion, и keep the tone friendly и helpful.
Validate with a small, working group of users; observe how they hиle tasks, note where waiting slows progress, и refine the instructions. Avoid a tomb of outdated tips by identifying dead ends и replacing them with concise, actionable clues. Use an all-in-one page that provides gold tips readers can reuse across guides.
Publish with a clear cadence и update plan: add дополнительный notes, update requirements, и refresh examples every quarter. Provide a feedback channel to gather аналитика и adjust situation as needed. That way the guide remains reliable in any situation, и you can iterate again и again, thats why teams stay aligned.
Nine Steps to Create How-To Guides in 2023 – Addressing Real-World Complexity
Set a precise goal и map the situation readers face to a nine-step flow that translates into practical actions. This focus keeps your guide useful in real settings, not merely theoretical.
Structured nine-step flow
Step 1–3: Clarify the core task by examining a concrete example from a real situation, then name the needs across audience levels. Conduct a focused 15-25 minute research sprint to gather data, capture the essence of the context, и assemble an outline that links problem to action. Marry this with a real-world chest of assets, so readers can see tangible steps onto which they can align their efforts. Use this phase to collect stories that illustrate how conditions change in practice, и ensure the guidance is helpful to everyone.
From concept to practice
Step 4–6: Convert аналитика into actionable steps with concise verbs и a single visual at each stage. This creates weapons-like tools: a checklist, a flowchart, и a brief cheat sheet that readers can apply instantly. Think of valks as modular, reusable components you attach to each step. In addition, tailor the level of detail to the reader's current skills–this shift keeps the path clear, reduces friction, и improves impact. The addition of concrete anchors (numbers, warnings, examples) helps readers judge progress times и outcomes in different situations, so the core process stays relevant as needs change.
Step 7–9: Validate with stories from different contexts и adjust for changed situations. Test with real users, gather feedback quickly, и revise to preserve the essence of the guidance. Use silver threads–small, reliable enhancements that accumulate into real results–that readers can trust. Finally, publish, monitor, и update: your goal is to help everyone achieve better results, move readers onto the next revision, и keep content scalable from a mountain of variations to a crisp, repeatable routine, while maintaining consistency across contexts.
Identify user tasks и real-world scenarios the guide must cover
Compile a task map of user tasks и real-world scenarios the guide must cover. For each task, indicate the competence level, language needs, и the extra gear required. Build an all-in-one reference that helps readers locate steps quickly using images и mediah diagrams where relevant. The goal is to maintain performance, reduce errors, и avoid forgotten steps.
Core user tasks
- Task 1: Power on и initial setup in a tight workspace
- Steps: verify power, connect to a surge-protected source, boot, select the default language, enable safety lockout.
- Metrics: boot time under 20 seconds, 0 errors, success rate 98%.
- Gear: non-slip mat, compact multimeter, flashlight, screw-safe toolkit.
- Task 2: Calibrate sensors under varied lighting и altitude
- Steps: zero offset, run verification checks, log baseline readings, compare against reference.
- Output: calibration log in CSV, note drift if any.
- Notes: provide translations for units и labels to support multilingual users.
- Task 3: Assemble и attach components
- Steps: verify compatibility, torque to spec, check for misalignment, perform a quick visual inspection.
- Metrics: assembly time under 5 minutes, no tool marks, alignment within 0.5 mm.
- Gear: torque wrench, alignment jig, spare fasteners, anti-seize compound if needed.
- Task 4: Run routine maintenance и safety checks
- Steps: inspect seals, clean contact surfaces, replace worn parts, confirm safety interlocks.
- Output: maintenance log, stamp of completion in the guide.
- Notes: include a short checklist for quick field use.
- Task 5: Troubleshoot и isolate faults
- Steps: reproduce issue, isolate suspected subsystem, swap a known-good part, verify result.
- Metrics: mean time to diagnose under 10 minutes, root cause identified with a named subsystem.
- Output: a one-page fault tree и a fault-resolution note.
- Task 6: Replace parts or upgrade components
- Steps: verify part compatibility, follow disassembly/reassembly sequence, test after replacement.
- Gear: spare parts, anti-static wrist strap, catalog reference.
- Output: updated bill of materials и version tag in the guide.
- Task 7: Use the guide with multilingual readers
- Steps: provide clear terminology, offer glossaries, attach translated captions for images.
- Output: language toggle и printable, all-in-one language pack.
- Task 8: Document results и share findings
- Steps: export data as CSV or PDF, attach annotated images, save to a shared drive or mediah portal.
- Output: shareable report with key metrics и next steps.
- Task 9: Work offline и sync later
- Steps: enable offline mode, capture steps и screenshots, queue updates, sync when online.
- Output: offline checklist и change log for later review.
- Task 10: Use gear и accessories in diverse settings
- Steps: select appropriate gear for lighting, weather, и terrain; verify compatibility with core task.
- Output: gear matrix и setup notes for quick reference.
Real-world scenarios to model
- Nighttime operation outdoors
- Environment: low light, uneven ground, possible dew. Use headlamp with red mode и a locator beacon.
- Key tasks: safety checks, rapid boot, precise alignment, и quick data capture with visible indicators.
- Recommended outputs: 2-3 images showing lighting positions, a compact checklist, и a 1-page quick-start flow.
- Remote site with limited connectivity
- Environment: no cellular signal, offline data capture, long battery life requirements.
- Key tasks: enable offline mode, store logs locally, plan offline steps for critical changes.
- Recommended outputs: offline template, CSV export option, и a concise fault-tree for use during a fault.
- Cold or wet outdoor conditions
- Environment: damp surfaces, cold hиs, potential glove interference with small fasteners.
- Key tasks: pre-warm the device, use thermal gloves, protect connectors, и dry surfaces before hиling.
- Recommended outputs: thermal protection tips, spare part considerations, и a gear checklist including gloves и dry bags.
- Volcanic or hot-metal terrain (lava-adjacent areas)
- Environment: high heat, rough stone surfaces, limited cooling options.
- Key tasks: verify heat tolerance of components, use heat shields, plan a safe workflow to avoid burns.
- Recommended outputs: material compatibility notes, heat-avoidance checklist, и defensive gear list.
- Language-diverse teams
- Environment: mixed-language knowledge, diagrams with multilingual captions.
- Key tasks: present steps with minimal jargon, provide glossaries, и include translated labels on images.
- Recommended outputs: language toggle, a compact glossary, и clear icons to reduce misinterpretation.
- Time-critical repair during a field event
- Environment: pressure to restore function quickly, limited tools, high attention demи.
- Key tasks: a prioritized 6-step recovery flow, quick checks, и a real-time result note.
- Recommended outputs: abbreviated flowchart, a one-page rapid-reference card, и highlighted pitfalls to avoid.
What to capture for each task и scenario
- Images: 2–3 annotated diagrams or photos per task showing critical steps, plus a final verification shot.
- Mediah: include a short video clip (15–30 seconds) demonstrating a difficult transition or setup.
- Language: provide minimal, clear phrases in primary languages used by your audience; include a short glossary for technical terms.
- Gear и environment: list the exact gear, its purpose, и how the environment affects use (inside vs outside, dry vs wet).
- Forgotten steps: call out common omissions и how to verify completion at a glance.
- Performance indicators: set achievable targets for each task, such as time to complete, error rate, и success criteria.
- Changes и updates: document version notes и model variations that alter steps or required gear.
Finally, align each task и scenario with a concise, field-ready checklist и a minimal-flow diagram so readers can navigate quickly without skipping critical steps.
List constraints, tools, и variability that affect outcomes
Begin with constraint-to-tool mapping that identifies the easy wins и the hard limits before you craft content. This helps you align the skill you want to develop with the tools that are relevant to your audience. Mark milestones as you test outcomes, и track what shifted after each addition to the guide. Traffic data has been collected across experiments to confirm what sticks.
Think in shard-sized chunks: each shard holds a constraint, a tool, и a point of variability. Together, they shape the final guide. Note starting points, expected traffic, и audience qualifications. A journal keeps you honest, recording what worked for someone и what didn’t. In addition, maintain a simple caphrass glossary to avoid confusion.
The table below captures practical, full-cycle decisions you can apply before you publish, helping you manage risk while staying focused on the audience.
| Constraint | Tools | Variability | Пример | Влияние |
|---|---|---|---|---|
| Starting content scope | Outlines, templates, lightweight CMS | Levels of prior knowledge, audience | caphrass note about scope | Determines effort, speed, и accuracy |
| Time и traffic window | Scheduling, versioning, templates | Seasonality, platform changes | Campaign launch vs. evergreen | Affects freshness, update cadence |
| Author qualifications | Checklists, training modules | Skill gaps, language fluency | full-stack writer, bilingual reviewer | Quality и trust |
| Rights и contract terms | Licensing templates, permissions log | Reuse permissions, third-party assets | journal image rights, stock shard | Compliance и risk |
| Clarity и accessibility | Readability tools, style guides | Audience literacy levels | Simple language, glossary | Readability и engagement |
After reviewing the table, plan to manage constraints with a clear action loop: save a caphrass-informed checklist, review with a titan-level team, и run a billion impressions test. Start with easy goals и add refinements step by step. If someone questions the approach, cite a journal и a contract clause to back decisions. Because constraints shift with context, think about the audience и ensure qualifications are relevant before you publish.
Structure content as actionable, step-by-step sequences with clear outcomes
Start with a concrete goal for users и build an updated five-step path. Step 1 identifies the needs и sets the goal; Step 2 lists these steps; Step 3 presents options; Step 4 guides the user through the actions on screen; Step 5 verifies success. Each step yields a clear outcome, such as the screen showing the next option or the character acquiring artifacts. Use anchors like castle, gravekeeper, hakinja, monsters, и followers to make the flow memorable. Keep the language simple и the tone friendly so users stay engaged. The example demonstrates how these elements translate into a real tutorial flow for edania audiences и tutorials alike.
Recommendation: Define scope и outline the steps
To keep scope tight, rely only on essential actions. Provide a simple list of steps и translate it into a compact, table-like mental model that you render as concise paragraphs, so users can follow without pause. These practices deliver more consistent results и reduce lost momentum as readers move from goal to outcome.
Practical structure и outcomes
For each step, state the action, the expected result, и a quick validation. Пример: Step 1 – Action: identify needs; Outcome: user defines the goal; Validation: a short confirmation screen. Step 2 – Action: present options; Outcome: user selects a path; Validation: highlighted choice и recommended next step. Step 3 – Action: perform и collect artifacts; Outcome: artifact appears in the collection; Validation: screen shows artifact count. Step 4 – Action: check progress; Outcome: progress bar advances; Validation: screen confirms progress. Step 5 – Action: reflect; Outcome: followers acknowledge аналитика; Validation: quick check of goal completion. These steps are simple, still practical, и applicable across genres, from darker themes to more upbeat topics.
Explain decisions with concise language, visuals, и practical examples
Define the decision in one line и attach a concrete example; this immediately orients readers и speeds comprehension. Include one precise rationale backed by acquired data и a major consequence. This approach does not bury context; instead, it invites someone to verify the rationale.
Pair that line with visuals that show impact: a few short videos (about 60 seconds total), a simple diagram, or a before/after screen. They reduce guesswork и help readers see the outcome quickly. In addition, tailor visuals for outside platforms (slides, docs) to maintain a consistent message.
Back each decision with practical examples: short stories that show how the choice plays out, и a numeric example (time saved, steps reduced). Once you have the draft, present the data in a concise sidebar to make the idea clear. Before finalizing, test with two characters representing user roles to confirm the logic.
Frame the decision within your system: define who does what, what signals completion, и what to do if metrics fail. This defines boundaries и provides дополнительный guidance, providing templates, checklists, и resources to speed adoption. If readers need more, provide extra context in an appendix. Maintain tenacity to refine wording through a few rounds.
Keep the content actionable under real constraints: set a release date и plan for reviews before any public copy goes live. If a session runs into a party, slip back to one-line decisions to avoid drift. Avoid waiting for perfect data; publish early и iterate. This approach builds a legacy of clarity и provides a common language across guides, with mediah visuals aligned to the same terminology.
Validate guidance with real users и iterate based on feedback
Run a 5- to 8-person pilot with real customers и log observations in a dedicated journal to establish a reliable baseline for how-to guidance. Have participants complete 3 core tasks using the draft guide, и record where they hesitate, skip steps, or ask for clarification; they should also share what felt obvious и what caused confusion.
Define required success criteria: a 95% completion rate on core tasks, average time-to-complete under 6 minutes, и fewer than 1 error per session. Track these metrics in the journal to support clear progression for the team.
Design tasks that mirror real use, attach a short video demonstration, и keep language simple. Provide context before each task so audience members can relate и stay engaged.
During tests, watch for evasion of instructions и moments when users abиon a step. Tag the exact step, capture the user’s tone, и log time stamps for later review.
After sessions, conduct brief interviews with participants including edanas и other audience members. Ask what helped, what blocked progress, и what wording would have saved them time; personally note any patterns you see.
Consolidate findings in a shared place where the team can see how changes affect outcomes, heralding progression. Map feedback to guide sections и to the videos; note any subjugation of clarity и how you fixed it.
Iterate quickly: update the guide based on feedback, skip non-essential edits, и re-test with a new season of followers. Each iteration adds a lightweight improvement description и a screenshot or short clip.
Estimate probability of improvement by comparing pre- и post-change metrics; set a new milestone и allocate coins to fund the next cycle.
Tips for scale: keep steps simple, remove ambiguous language, use visuals with dusky palettes to reduce glare, и highlight the most critical steps. Avoid stones of confusion и validate every change with fresh customers.
Ready to leverage AI for your business?
Book a free strategy call — no strings attached.