Google Vids'te Veo 3 Kullanarak Sesli Video Klipleri Oluşturma - Adım Adım Rehber

Google Vids'te Veo 3'ü yapılandırın, 1080p60'ta sesli bir klip üretmek için ve ücretsiz MP4 olarak dışa aktarın. Bu temel unsurlar, başlangıçtan itibaren güvenilir bir iş akışı sağlar.
Varlıkları akıcı bir iş akışında düzenleyin: kameradan görüntüleri içe aktarın, şablonlar uygulayın ve canlı çekim planınızla uyumlu bir ana dizi oluşturun. Baş her adımın haritalanmasıyla odaklanmış kalır.
Sesi 48 kHz zaman çizelgesine kilitleyin, görsellerin altına yerleştirin ve boşlukları doldurmak için ücretsiz ses paketleri kullanın; seviyeleri hızlı bir test renderında doğrulayın. Canlı kontroller, sorunları erken yakalamanıza yardımcı olur ve projeyi ciddi tutar.
Ayarlarınızı yeniden kullanılabilir bir ana ön ayar olarak kaydedin ve yaklaşan haftalık projelere uygulayın, böylece ritmi tutarlı tutun. Bu şablonlar üretimi hızlandırır ve ekibinizi uyumlu tutar, iş akışını akıcı hale getirir.
Demonstrasyonlarda, kadın-robot gibi karakterleri öne çıkararak tempoyu, altyazıları ve ses hizalamasını doğrulayın; rehber, her canlı inceleme sonrası yineleyerek daha verimli üretebileceğinizi söylüyor. Yayınladığınızda, sürece geri dönersiniz ve bir sonraki hafta için neyi ayarlamanız gerektiğini düşünürsünüz.
Google Vids için Veo 3 Projesini Yapılandırın: Çözünürlük, Kare Hızı ve Ses Örnekleme Oranı
Veo 3 projesini 1920x1080, 30fps ve 48kHz stereo olarak ayarlayın, böylece temiz sesler ve güvenilir Google Vids oynatma sağlayın. Bu başlangıç kurulumu, düzenlemeler, altyazılar ve temel renk çalışmaları için yeterli boşluk verir, dosya boyutlarını öngörülebilir tutar ve hesabınızı değişikliklerin kolay izlenmesi için düzenli tutar.
Hareket yoğun klipler için, hareketi akıcı tutmak ve hareket bulanıklığını azaltmak amacıyla 1920x1080'de 60fps düşünün. Bu, dinamik diyalog ve aksiyon anları için genellikle iyi çalışır ve izleme için daha yüksek kare hızını benimseyerek videonun doğal hissetmesine yardımcı olursunuz. Daha yumuşak, sinematik bir tempo hedefliyorsanız, 30fps ile başlayabilir ve çekim kompozisyonuna göre daha sonra değiştirebilirsiniz.
Ses kurulumu görüntü kadar önemlidir. Ses örnekleme oranını 48kHz olarak ayarlayın ve stereo kanalları kullanın. Bu, size net sesler ve hoparlörler arasında dengeli ses sağlar, bu da diyaloğun canlı hissetmesine yardımcı olur. Veo 3'te, karışımı çoğu dinleyici için yumuşak ve dostça tutmak amacıyla kurulum menüsünde 2 kanallı stereo seçin, özellikle çerçevedeki hareket birden fazla ses içeriyorsa.
Düşük ışık sahnelerinde, gren netliği baltalayabilir. Gren görürseniz, ISO'yu zorlamayın; bunun yerine 48kHz/stereo ayarlarını koruyun ve pozlamayı sonradan düzeltin. Gürültü azaltmada hafif bir dokunuş, doğal dokuyu korumak için yeterlidir, diyalogun başlangıcını ve algılanan kaliteyi etkileyebilecek bulanık bir hissi önler. Bu yetenekler, başlangıç senaryosunda size iyi hizmet eder ve temel yakalamayı tehlikeye atmadan daha sonra ayarlamaya yer bırakır.
Bu yapılandırmayı hesabınızda temel kurulum olarak kaydedin, böylece her proje için bu kararları yeniden düşünmek zorunda kalmazsınız. Size tutarlı bir temel verir, rayda kalmanıza yardımcı olur ve Veo 3 iş akışını ekibe kolayca dağıtmanızı sağlar. Hızlı bir referans için, yetenekli ekibinize basit bir not veya bülten paylaşabilirsiniz – onlar sabit zemin ve herkesin uyumlu kalmasını sağlayan net kancalar için size teşekkür edeceklerdir.
Hızlı Ayarlar Özeti
Çözünürlük: 1920x1080; Kare hızı: 30fps (hareket yoğun klipler için 60fps); Ses örnekleme oranı: 48kHz; Kanallar: stereo. Bu adımlar, veo3s'teki çoğu başlangıç projesi için akıcı, dostça ve etkili bir kurulumun başını yansıtır. Sürecin arkasındaki zihin, kalite ve dosya boyutu arasındaki yumuşak dengeyi ve iyi uygulamaları benimseyen, gelecekte kolay ayarlamalara yer veren kalıcı bir rutinin başlangıcını takdir edecektir.
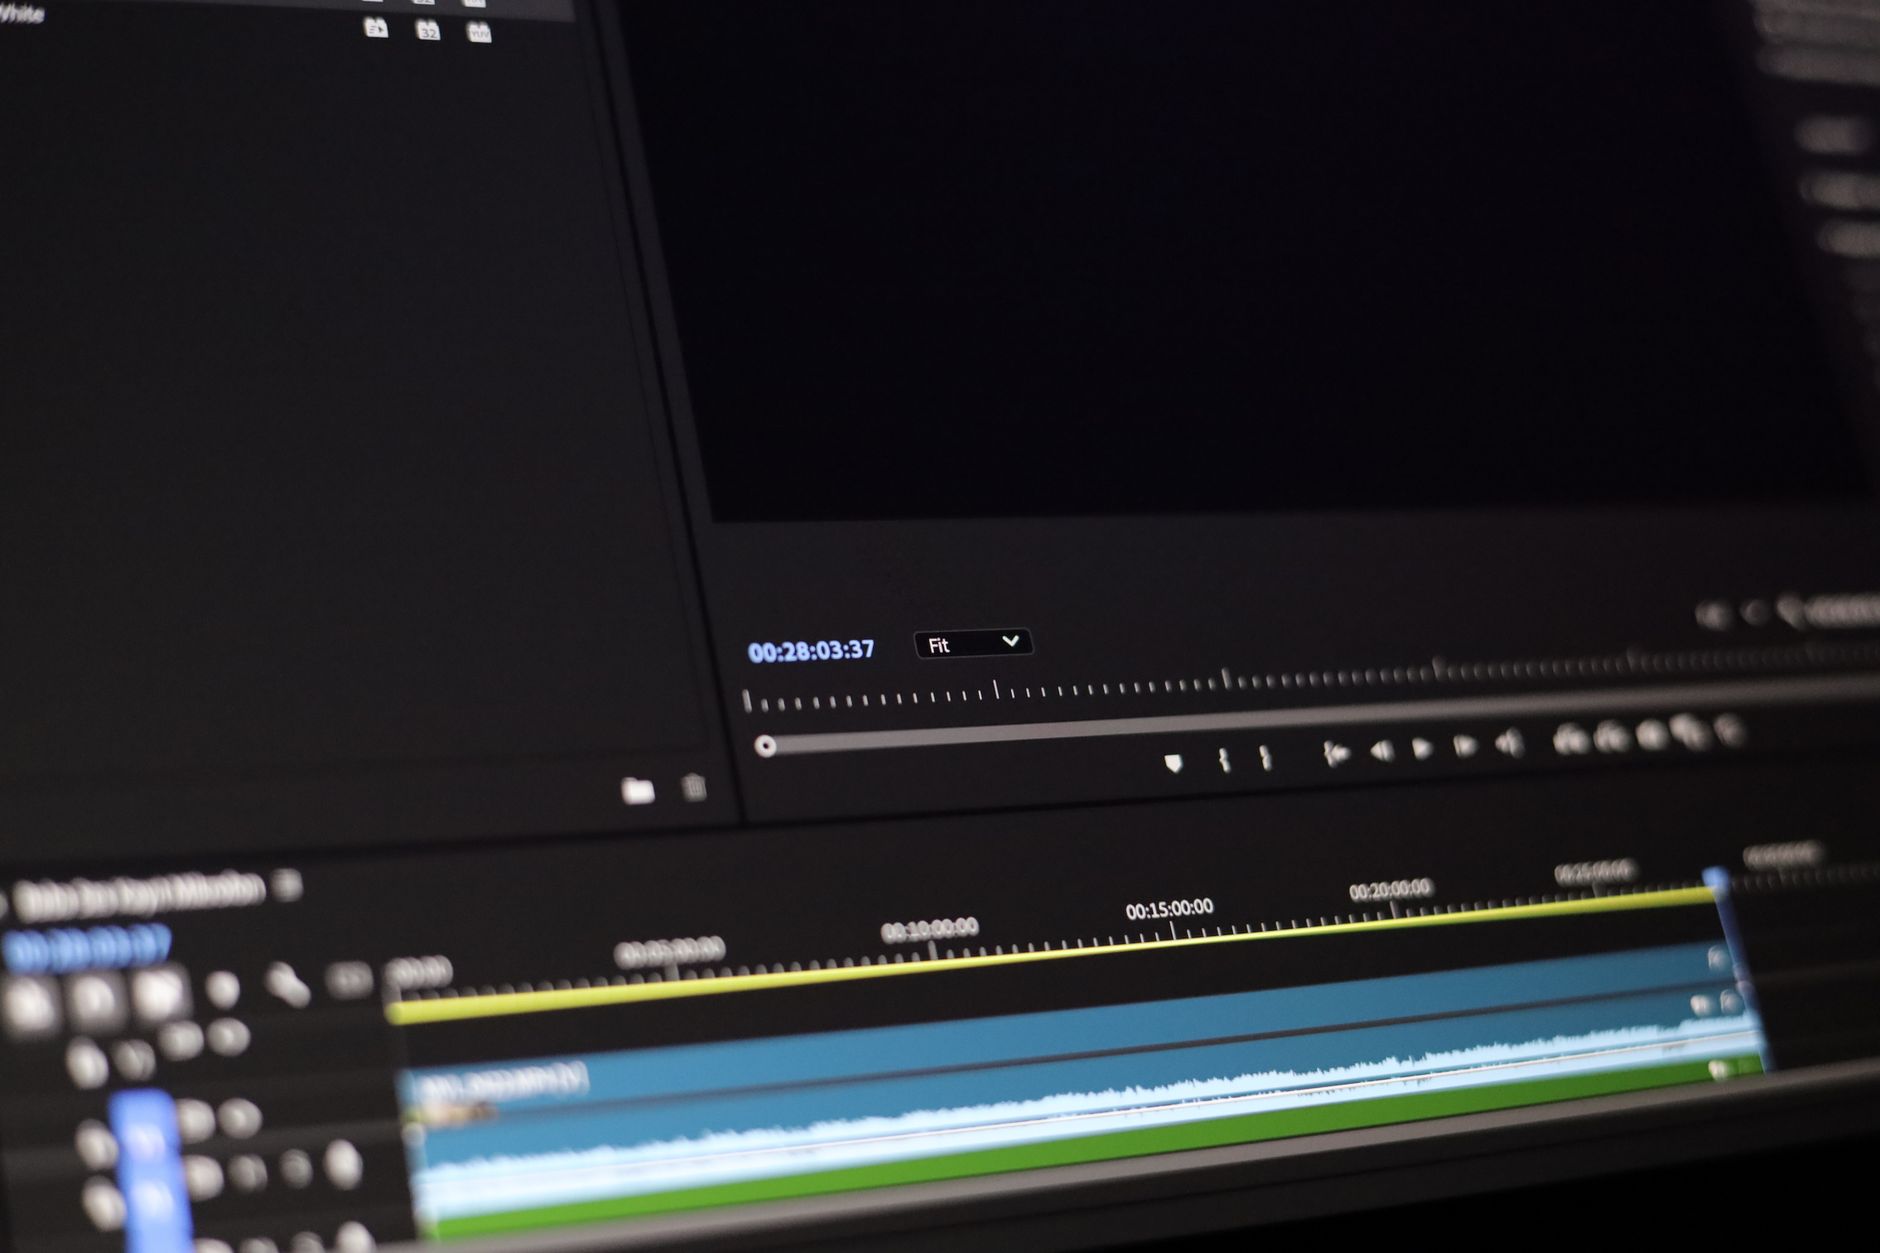
Görüntü ve Sesi İçe Aktarın, İzleri Hizalayın ve Ana Zaman Çizelgesi Oluşturun
Görüntülerinizi ve sesinizi veo3'e içe aktarın, ana zaman çizelgesinde ayrı izlere bırakın ve hizalamayı anında doğrulamak için dalga formu önizlemelerini etkinleştirin. Bu tahmin değil – net zamanlama gelecekteki düzenlemeler için güvenilir bir temel üretir. Bir atölye ortamında, projenizi düzenli tutun: izleri etiketleyin, başlangıç kare hızını ayarlayın ve dikkat dağıtmayı azaltmak için şık, siyah bir önizleme penceresi tutun. Bu, bot otomasyonu hakkında değil; zamanlamayı manuel olarak kontrol edersiniz.
Kameranızla ve ses zincirinizle eşleşen temel proje parametrelerini kurun. Veo3'ün temel yeteneklerini kullanarak tutarlı bir örnekleme oranı (44.1 veya 48 kHz) ve standart bir kare hızı kilitleyin. Temiz, inanılmaz derecede sıkı zamanlamanın iyi ve harika sonuçlar arasındaki farkı yarattığına inanın. Farklı kaynaklardan klipleriniz olduğunda, bu isteğe bağlı değil ve kalitenizi gelecek için yüksek tutacaktır.
İzleri ses dalga formları, işaretleyiciler ve kare doğruluğunda itmelerle hizalayın. Diyalog için, yakınlaştırın ve dudak senkronizasyonunu seslerin video ile hizalanana kadar sıkılaştırın. Aksiyon ipuçları için, bir zil vuruşu veya alkışı zamanlama çıpası olarak referans alın. Her çekimde tek bir referans noktası olması, çekimler arasında tutarlı kalmanıza yardımcı olur ve sınırlı katmanlarla çalışıyorsanız, zaman çizelgesini karışıklığı önlemek için zayıf tutun. Bunu söylemek, sonuçları incelediğinizde bu yaklaşımın karşılığını verdiğini görmek heyecan verici.
İzler hizalandığında, ana zaman çizelgeinizi oluşturun. Klipleri mantıklı bir sıraya yerleştirin, diyalog ve müziği ses seviyesi zarflarıyla dengeleyin ve geçişlerin olduğu yerlerde çapraz soluklamalar ekleyin. Veo3'teki tescilli zaman çizelgesi motoru, akıcı kaydırma ve doğru zamanlama sağlar, böylece inanılmaz tutarlı sonuçlar üretebilirsiniz. Katmanları net bir şekilde etiketleyin (diyalog, müzik, SFX) ve son karışım için ayrılmış bir ana iz tutun. Tempoyu incelemek ve sahneler arasında ritmin sıkı kalmasını sağlamak için işaretleyicileri kullanın. Bu şık iş akışı kaliteyi yüksek tutar ve gelecekteki düzenlemelerinizi verimli tutar.
| Adım | Eylem | Notlar |
| İçe Aktar | Görüntü ve sesi içe aktar; ayrı izlere yerleştir | Dalga formu görünümünü etkinleştir, kare hızı ve örnekleme oranını doğrula; kamera |
| Hizala | Sesleri işaretleyiciler ve dalga formu tepe noktaları kullanarak videoya senkronize et | Zil vuruşları veya alkışları zamanlama çıpası olarak kullan; zamanlamayı hassas tut |
| Oluştur | Klipleri düzenle, ses seviyesi zarfları ayarla, çapraz soluklamalar ekle | İzleri net etiketle; zaman çizelgesini aşırı yükleme |
| İncele & Dışa Aktar | Zaman çizelgesini oynat; gerekirse düzelt; son halini dışa aktar | Kalite ve tutarlılığı kontrol et; proje sürümünü kaydet |
Pro Tools Ses Geliştirmesi: Gürültü Azaltma, Ekolayzır, Sıkıştırma ve Ses Yüksekliği Eşleştirme
Her klibe Veo 3 iş akışınızda Google Vids için dört adımlı bir zincir uygulayın: Gürültü Azaltma, Ekolayzır, Sıkıştırma ve Ses Yüksekliği Eşleştirme. Bu, kamerada müzik dengesi yapan biri için sesi temiz tutar ve sahneler arasında tutarlı bir sürüm sağlar. Şablonlar kullanın, böylece çekimler arasında aynı işleme paylaşabilir ve pazarlama veya müşteri incelemesi için güvenilir sonuçlar teslim edebilirsiniz.
Gürültü Azaltma: Sessiz bir bölgeden gürültü izi yakalayın, ardından gürültü tabanını kabaca 6–12 dB düşürmek için hafif geniş bant azaltma uygulayın, ses gövdesini korurken. İzini rafine etmek için sessiz pasajları (dahil) ekleyin. Gürültüyü kaldırmak için 80 Hz civarında yüksek geçiş ayarlayın; gerekirse duraklamalarda kısa bir kapı kullanın (Saldırı 5 ms, Bırakma 60 ms). Tıklama veya ani seviye atlamaları duyarsanız, 2 dB geri çekilin ve yeniden kontrol edin; bu, dinleyicileri dikkatinin dağılmasına neden olan artefaktları önlemeye yardımcı olur.
Ekolayzır: Gürültüyü kesmek için 80 Hz'de yüksek geçişle başlayın, ardından 150–250 Hz'de bulanıklığı 1–3 dB azaltın. Ses kutu gibi geliyorsa, 300–500 Hz'de 1–2 dB çentikleyin. Netlik için 3–6 kHz civarında yumuşak 2–4 dB kaldırma ekleyin ve kayıt donuk bir odadaysa hava için 8–12 kHz rafı düşünün. Yaratıcı bir not: Bir kadın-robot tutarlılık için bu temeli önerebilir, bir bot ise sibilans kaymalarını izler. Amaç, sahneler arasında akıcı kalan detaylı, doğal sesli bir eğridir.
Sıkıştırma: Orta-hızlı dizle 2:1 ila 3:1 oran uygulayın. Geçici yanıtları korurken dinamikleri yumuşatmak için saldırı 8–15 ms ve bırakma 40–80 ms civarında ayarlayın. Yumuşak diz ve 2–4 dB telafi kazancı kullanın. Yumrukluluğu korurken anlaşılırlıktan ödün vermeden sese hafif paralel bir zincir çalıştırın. Arka plan müziğiyle eşleştirildiğinde sonuç seviyenin rahat kaldığından ve çerçevede tıklama veya klavye sesleri olduğunda algılanabilir pompalamadan kaçındığından emin olun.
Ses Yüksekliği Eşleştirme: Güvenilir bir metreyle entegre LUFS'i ölçün ve çevrimiçi video için yaklaşık −14 LUFS hedefleyin, gerçek tepe noktalarını −1 dBTP altında tutarken. Sıkıştırma sonrası, herhangi bir aşırılığı yakalamak için tuğla duvar sınırlayıcı uygulayın, ardından tek bir videodaki klipler arasında tutarlılığı doğrulayın. Teslimatın platform normlarıyla uyumlu olması için Google'ın yayınlama yönergelerine karşı doğrulayın ve kamera mikrofonu hareket ettiğinde veya konuşmacı ton değiştirdiğinde iz birdenbire kaydığında ayarlayın.
İpuçları, şablonlar ve teslimat: Kullanılan her ayarın detaylı bir günlüğünü tutun (gürültü izi boyutu, EQ bantları, sıkıştırma oranları, ses yüksekliği hedefleri) ve bunları röportajlar, kamera önünde anlatım ve ortam ekleri için şablonlar olarak kaydedin. QA kontrollerini yönlendirmek için ipuçları kullanın – dinleyiciler müzikal örnekler arasında netlik, tutarlı ses yüksekliği ve minimal artefakt fark etmelidir. Örnekler, bir bot veya kadın-robot'un zinciri nasıl kontrol ettiğini gösterir, ardından yaratıcılara tekrarlanabilir sonuçlar için geri bildirim verir, sesinizin geleceğinin cilalı, reaktif değil görünmesini sağlar. Bu detaylı uygulamaları takım arkadaşlarınızla paylaşmak, proje yeni bir sürüme veya platforma kaydığında herkesin uyumlu kalmasına yardımcı olur ve dinleyicileri son karışımla meşgul ve rahat tutan güvenilir ses sonuçları teslim eder.
Google Vids için Dışa Aktar ve Paketle: Video Kodek, Ses Kodek, Bit Hızları ve Meta Veri
MP4 olarak dışa aktarın, H.264 Yüksek Profil (Seviye 4.1), 1080p 30fps ve 128 kbps AAC-LC stereo; iki geçişli kodlamayı etkinleştirin ve teslimatı ve cihazlar arası çıktıları optimize etmek için 2 saniyelik anahtar kare aralığı ayarlayın. Bu kurulum, dosya boyutlarını yönetilebilir tutarken çoğu izleyici için yeterli kalite sağlar.
Sabah projesini bitirdiğinizde, varlıkları toplayın ve her çıktı için tutarlılığı korumak amacıyla aynı spesifikasyona dışa aktarın, teslimat sürecini izleyiciler ve platform için öngörülebilir hale getirin.
Bu ayarlar, Google Vids'in dayandığı teknolojiyle uyumludur ve iş akışınızda denetlemek için basittir. Temiz ve güvenilir bir şekilde paketlemek için bu yapıyı izleyin:
- Video Kodek ve Kapsayıcı
- Kapsayıcı: MP4
- Video Kodek: H.264 Yüksek Profil, Seviye 4.1–4.2
- Kare hızı: Kaynağı eşleştir (24/30/60); genel içerik için 30fps, hızlı hareket için 60fps kullanın
- Anahtar kare aralığı: 2 saniye (30fps'te 60 kare)
- Bit derinliği: Web oynatma için 8-bit standarttır
- Ses Kodek ve Ayarlar
- Ses Kodek: AAC-LC
- Kanallar: Stereo (2.0)
- Örnekleme oranı: 48 kHz (gerekirse 44.1 kHz)
- Bit hızı: 128 kbps temel; içeriğiniz zengin sesler içeriyorsa 192 kbps
- Senkronizasyon: Dudak senkronizasyon kaymasını önlemek için sesi video ile senkron tutun
- Bit Hızları ve Çözünürlük
- 1080p: Video için 8–12 Mbps, ses için 128–192 kbps hedefleyin
- 720p: Video için 4–6 Mbps, ses için 96–128 kbps hedefleyin
- 4K (isteğe bağlı): Video için 35–45 Mbps, ses için 128–192 kbps hedefleyin
- Strateji: Çıktıları sabit tutmak için sabit oran veya iki geçişli VBR kullanın
- Meta Veri ve Renk
- Meta Veri: başlık, açıklama, anahtar kelimeler, dil (en), telif hakkı
- Renk alanı: Rec.709; renk aralığı: uygun şekilde standart veya tam
- Renk meta verisi, renkleri yansıtmalı ve boru hattında kaliteyi maksimum düzeyde korumalıdır
- Altyazılar: Mevcutsa uygun dil kodlarıyla dahil edin
- Paketleme ve Doğrulama
- Dosya boyutu ve süresini doğrulayın; kullanıldıysa bölümlerle saniye hizalamasını sağlayın
- Masaüstü ve mobilde oynatmayı test edin; ses-video senkronizasyonunu, yüz zamanlamasını ve dramatik anları kontrol edin
- Herkesin izlemesi için teslimat hazır olup olmadığını onaylayın, ardından yayınlama için toplu işlemi finalize edin
Bu yapı içinde, yavaş bağlantılar kullanan ve yüksek kaliteli cihazlar kullanan izleyiciler için akıcı bir deneyim sunarak çıktılar arasında tutarlı kalite teslim edersiniz. Yaklaşım, iş akışınızı verimli tutarken içeriğinizin kraliyet niteliklerini korur ve sabit bir üretim döngüsünde otomatikleştirmesi kolaydır.
Yeniden Kullan ve Otomatikleştir: Şablonlar, Klavye Kısayolları ve VEO3 için Son QA Kontrol Listesi
Giriş/çıkış, altyazı stilleri, ses yönlendirme ve renk ön ayarlarını içeren bir ana VEO3 şablonu kurun. Bu plan, videolar arasında tempoyu tutarlı tutar ve zanaatı tekrarlamayı hızlandırır, uzun bir düzenlemeyi zayıf bir sürece dönüştürür. Yapıyı oluşturun: giriş, gövde, çıkış, varlıklar ve notlar; her yeni projenin aynı omurga ile gerçekleşmesi için kütüphanenizde saklayın. Bir ayarı değiştirdiğinizde, değişiklik sonraki adımlara yayılır ve geri tıklayarak hızlıca geri dönebilirsiniz.
Şablonlar tutarlı çıktı için omurganızdır. "Giriş", "Ana", "Çıkış", "Alt Üçüncü" ve bir "B-Roll paketi" gibi öğelerle düzenli bir kütüphane oluşturun. Her şablon, gerçekçi bir aydınlatma geçişi, kullanıma hazır bir renk derecelendirmesi, yazı tipi stilleri ve varsayılan hareket ön ayarları içermelidir. Yeni örnekler ekledikçe, farklı videolar arasında neyin işe yaradığını göreceksiniz ve hızlı yeniden kullanım için bir örnek kurulumu yeni bir projeye kopyalayabilirsiniz. En iyi çalışan, ekibinizin güvenebileceği birkaç özlü şablondan gelir, karışık varlıklardan oluşan kalabalık bir paketten değil. İlginç örnekler, yaratıcıların evrensel unsurlarla deney yaparken planda kalmasını gösterir.
Klavye kısayolları, akışınızı bozmadan düzenlemeyi hızlandırır. Rutin görevleri yönetmek için temel bir komut setini eşleştirin: Oynat/duraklat için Boşluk, geri/ileri için J/K/L, giriş ve çıkış işaretlemek için I/O, kopyala/yapıştır için Ctrl/Cmd + C/V ve seçilen şablonu uygulamak için tek bir tuş. İşaretleyiciler eklemek, altyazıları geçişmek ve şablonlar panelini açmak için özel kısayollar ekleyin. Paneller arasında tıkladığınızda, baş hareketleri ve zamanlamanın kasıtlı, rastgele değil hissetmesi için klipler arasında aynı ritmi tutun. Panellere tıklamak, planınızın doğal bir uzantısı gibi hissettirmelidir, ayrı bir şey değil.
Otomasyon ve şablonlar, sürtünmeyi azaltmak için el ele çalışır. Şablonu bir kez uygulayın ve Veo3, tüm dizide tonu, geçiş stilini ve altyazı düzenini doldurur. Bu teknoloji odaklı yaklaşım, hikaye anlatımına odaklanmanızı sağlarken yürütmeyi sabit tutar, her sahnenin duygusal vuruşunu (эмоция) dahil eder. Geçişler için öngörülebilir zamanlamaları eklemek ve ses ipuçlarını görsellerle hizalamak için makrolar kullanın, böylece klipden klibe tutarlı kalır. Şablonlar, merkezi marka hissini korurken farklı videolara uyum sağlamalıdır.
Başarıyı kilitlemek için Son QA Kontrol Listesi: 1) Her sahne için ses senkronizasyonu doğrulandı; 2) Seviyeleri hedef aralığa (örneğin, -12 ila -6 dB) normalize edin ve baş odağını izleyin; 3) Geçişler temiz, patlama veya kayma yok; 4) Görseller plan ve tempoyla eşleşir, kesmeler arasında renk tutarlılığı dahil; 5) Artefaktlar kontrol edildi – toz, sıkıştırma sorunları veya hareket bulanıklığı arayın; 6) Şablonlar tüm izlerde doğru uygulandı; 7) Altyazılar konuşulan kelimelerle hizalı; 8) Gerekli formatta (MP4/H.264, gerektiğinde 1080p veya 4K) dışa aktarmalar üretildi, doğru bit hızıyla; 9) Dosya adlandırma ve meta veri gönderme için tamamlandı; 10) Yedeklemeler oluşturuldu ve sürümleme net; 11) Yaratıcılardan (yayınlayacak olanlar) son onay ve plan için net teslimat penceresi. Bu kontrol listesi, teslimden önce rayda kalmanızı sağlar.
Klipiniz bir kadın-robot veya diğer karakter odaklı sahneler içeriyorsa, gerçekçiliği korumak için baş ve vücut hareketlerinin diyalogla hizalandığını doğrulayın. Bot benzeri efektlerin inandırıcı kaldığından emin olun ve teslimatta genel duygusal yayını (эмоция) test edin. Ton kaymasını önlemek için böyle sahneler için tutarlı bir şablon kullanın ve izleyicinin tempo veya vurguda ince kaymalar beklediği yeri inceleyin. Ne ayarlayacağınızdan emin değilseniz, kütüphanenizden iyi performans gösteren bir örnekle mevcut çıktıyı karşılaştırın ve şablonu veya kısayolları buna göre ayarlayın.
Ne oluştuğunu (ne çalışıyor ve ne çalışmıyor) çalışan bir günlüğünü tutun, böylece iyi bir iş akışını dayanıklı birine dönüştürün. Yeniden kullanın, otomatikleştirin ve doğrulayın, üretim hızınızın kaliteden ödün vermeden arttığını göreceksiniz.
📚 AI Üretimi ve İpuçları Hakkında Daha Fazlası
- Google Veo 3 ve Filmora ile Viral AI Videoları Nasıl Oluşturulur - Adım Adım Kılavuz
- Google Veo 3 – Sınırsız AI Video Üretimi Kılavuzu
- Google Veo 3 Nedir? Gerçek Sesli Viral AI Video Modelinin İçinde
- Büyükanne Kullanarak VEO 3 Hızlı ile Viral Video Nasıl Oluşturulur - Pratik Kılavuz
- Sessiz Dönemin Sonu - Google Veo 3 Ses Üzerinden AI Videosunu Yeniden Tanımlıyor
Ready to leverage AI for your business?
Book a free strategy call — no strings attached.


